Install Ubuntu or Linux Operating System on Virtual Machine (Virt-Manager)
Craze for Testing Operating Systems
I used to be a distro-hopper during my initial introduction to Linux. I made Live CDs of beginner-friendly Linux OSs such as Ubuntu, Fedora, Mandriva, Open Suse, etc., whenever they are released. I am also fascinated about testing mini and micro Linux OSs such as Dam Small Linux (DSL), Puppy, Slitaz, Tiny Core, Astrumi, etc., just to check how they work on my laptop. To get Linux ISO files, I even subscribed to technology magazines such as Digits and Linux for You (later the magazine name was renamed Open Source for You). Later came the craze to test Distros using Linux Live USB. The entire process of testing Distros from the external device was always time-consuming.
Things have changed now. Due to my professional work requirements, I had to install and test various software on an independent Linux or Windows platform. Hence, I started looking at a way to quickly test Distros without disturbing my current OS. Searched for a solution and found that Virtual Box is the correct fit to do this job. There are a lot of tutorials available on the internet to install Virtual Box on the host, install Guest OS on Virtual Box and configure the software for better performance. I have installed many Linux and Windows OSs. It always worked out of the box and little tweaking is required for making it usable.
But Virtual Box always gave me a surprise. Every time the software is upgraded, it breaks the Guest OS installation due to incompatibilities. On certain occasions, I also found that the performance of the Guest OS is a little laggy after the update.
What are Other Options for Virtualisation?
After using Virtual Box, I was reading a lot about virtualisation technologies. That lead me to try other virtualisation solutions on my laptop to check if it is better than Virtual Box. Apart from Virtual Box, there are various other software also available to test Guest OS within host OS. Most popular free virtualisation software are:-
- VMware Workstation Player
- Quick EMUlator (QEMU)
- Virt-Manager
After reading the pros and cons, I decided to try VMware Workstation Player on my Arch Linux. But it turned out to be a disaster. The installation and usability of Guest OS were very slow. I could not use it for even testing purposes. Therefore, I tried the next one on the list i.e., QEMU. QEMU is based on a Kernel-based Virtual Machine (KVM). That means the virtualisation support is built into the Kernel itself instead of relying on additional third-party virtualisation support. QEMU looked promising. But going through various documentation and blog posts, I understood that it requires more reading to understand how software is to be configured and there is no dedicated GUI present. Hence, I decided to fix on to Virt-Manager.
My Requirements
Since I will be using the Virtual Machine on my laptop and not on any production machine, I am not worried about security aspects. Following are the options I configure in my Virtual Box software and I want the same to be supported by Virt-Manager:
- Support for varieties of Linux and Windows as Guest OS
- Boot and install from ISO files
- Allocate more processors
- Allocate more memory (RAM)
- Manual adjustment of HDD
- Sharing of files between Host and Guest OSs (most important)
- Bidirectional clipboard sharing
- Software should be easy to use and configure
- Network sharing between Host and Guest
System and Software Configurations
Below are my system configurations. The most important thing to note is my laptop has 8 processors, 16GB RAM, enough HDD space, NVIDIA, and Intel Graphics cards.
1
2
3
4
5
6
7
8
9
10
11
12
13
14
15
16
17
18
19
20
21
22
$ neofetch
                   -`
                  .o+`                   wxguy@archlinux
                 `ooo/                   ----------------
                `+oooo:                  OS: Arch Linux x86_64
               `+oooooo:                 Host: X510UNR 1.0
               -+oooooo+:                Kernel: 5.15.39-1-lts
             `/:-:++oooo+:               Uptime: 1 hours, 3 mins
            `/++++/+++++++:              Packages: 1058 (pacman)
           `/++++++++++++++:             Shell: zsh 5.8.1
          `/+++ooooooooooooo/`           Resolution: 1920x1080
         ./ooosssso++osssssso+`          DE: Plasma 5.24.5
        .oossssso-````/ossssss+`         WM: KWin
       -osssssso.      :ssssssso.        WM Theme: Simply_Circles
      :osssssss/        osssso+++.       Theme: Breath Dark [Plasma], Relax-GTK [GTK2/3]
     /ossssssss/        +ssssooo/-       Icons: Papirus-Dark [Plasma], Papirus-Dark [GTK2/3]
   `/ossssso+/:-        -:/+osssso+-     Terminal: konsole
  `+sso+:-`                 `.-/+oso:    Terminal Font: Hack 13
 `++:.                           `-/+/   CPU: Intel i7-8550U (8) @ 4.000GHz
 .`                                 `/   GPU: NVIDIA GeForce MX150
                                         GPU: Intel UHD Graphics 620
                                         Memory: 14090MiB / 15888MiB
I have decided to use Ubuntu 22.04 as a Guest OS as it is one of the most popular and I also wanted to test the new version. The ISO file I used was ubuntu-22.04-desktop-amd64.iso. Some of the above-listed requirements are only available in the latest Kernel and QEMU versions. Here are my other software details:
Kernel
1
2
$ uname -a
Linux archlinux 5.15.39-1-lts #1 SMP Thu, 12 May 2022 13:21:59 +0000 x86_64 GNU/Linux
QEMU
1
2
3
$ qemu-system-x86_64 --version
QEMU emulator version 7.0.0
Copyright (c) 2003-2022 Fabrice Bellard and the QEMU Project developers
Virt-Manager
1
2
$ virt-manager --version
4.0.0
Install Necessary Software on Host OS
The first step in installing Virt-Manager is to install the virt-manager package itself, along with other additional software. Below is the command I used on Arch Linux:
1
$ sudo pacman -S virt-manager qemu vde2 dnsmasq bridge-utils
Virt-Manager is based on libvirt. Therefore, before proceeding further, we need to enable and start libvirtd services.
1
2
$ sudo systemctl enable  libvirtd
$ sudo systemctl start libvirtd
You can check if the service is running using the below command:
1
2
3
4
5
6
7
8
9
10
11
12
13
14
15
16
17
18
$ sudo systemctl status libvirtd
● libvirtd.service - Virtualization daemon
     Loaded: loaded (/usr/lib/systemd/system/libvirtd.service; enabled; vendor preset: disabled)
     Active: active (running) since Sun 2022-05-15 13:07:20 IST; 4h 38min ago
TriggeredBy: ● libvirtd.socket
             ● libvirtd-ro.socket
             ● libvirtd-admin.socket
       Docs: man:libvirtd(8)
             https://libvirt.org
   Main PID: 23275 (libvirtd)
      Tasks: 22 (limit: 32768)
     Memory: 20.7M
        CPU: 35.944s
     CGroup: /system.slice/libvirtd.service
             ├─   718 /usr/bin/dnsmasq --conf-file=/var/lib/libvirt/dnsmasq/default.conf --leasefile-r>
             ├─   719 /usr/bin/dnsmasq --conf-file=/var/lib/libvirt/dnsmasq/default.conf --leasefile-r>
             └─ 23275 /usr/bin/libvirtd --timeout 120
You should also add KVM and libvirt to the user group to make virt-manager work properly. The below command will automatically add a logged-in user to the group.
1
2
$ sudo usermod -aG $(whoami) libvirt
$ sudo usermod -aG $(whoami) kvm
During my test, I found that if the Guest OS is not able to connect to Host OS, then the Guest OS will not boot and throw you the following error message.
1
2
3
4
5
6
7
8
9
10
11
12
13
14
Error starting domain: Requested operation is not valid: network 'default' is not active

Traceback (most recent call last):
  File "/usr/share/virt-manager/virtManager/asyncjob.py", line 72, in cb_wrapper
    callback(asyncjob, *args, **kwargs)
  File "/usr/share/virt-manager/virtManager/asyncjob.py", line 108, in tmpcb
    callback(*args, **kwargs)
  File "/usr/share/virt-manager/virtManager/object/libvirtobject.py", line 57, in newfn
    ret = fn(self, *args, **kwargs)
  File "/usr/share/virt-manager/virtManager/object/domain.py", line 1384, in startup
    self._backend.create()
  File "/usr/lib/python3.10/site-packages/libvirt.py", line 1353, in create
    raise libvirtError('virDomainCreate() failed')
libvirt.libvirtError: Requested operation is not valid: network 'default' is not active
To avoid this error, we need to follow a few more additional steps. Go to Virt-Manager GUI –> Edit –> Connection Details –> Virtual Networks –> Auto start –> enable On Boot. Thereafter, issue the following command to ensure the default network is auto-started whenever you boot your system.
1
$ sudo virsh net-autostart default
Now go ahead and reboot your Host OS / Laptop.
Now that we have installed Virt-Manager, we can proceed further to install Ubuntu 22.04 as Guest OS. I used a lot of screenshots for beginners to understand quickly.
Install Ubuntu as Guest OS on Virt-Manager
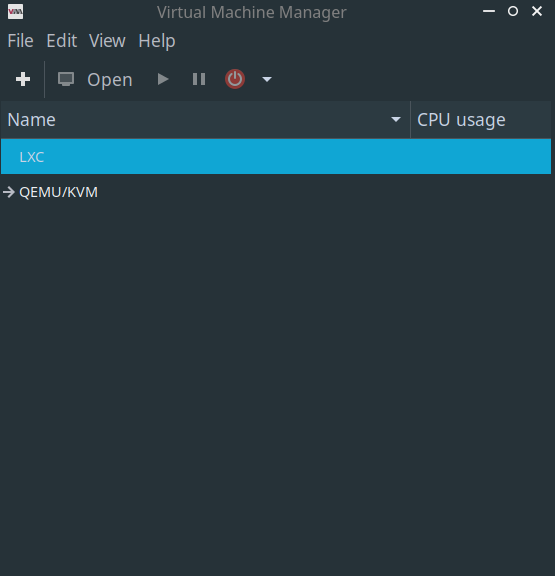
The first impression after opening the Virt-Manager GUI was not so good. It looked very minimal as compared with Virtual Box. There are just two rows with the name LXC and QEMU/KVM I could see on the Virt-Manager GUI.
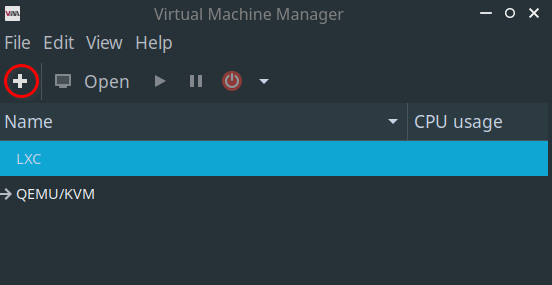
You can add a Virtual Machine by clicking on the + sign as shown below.
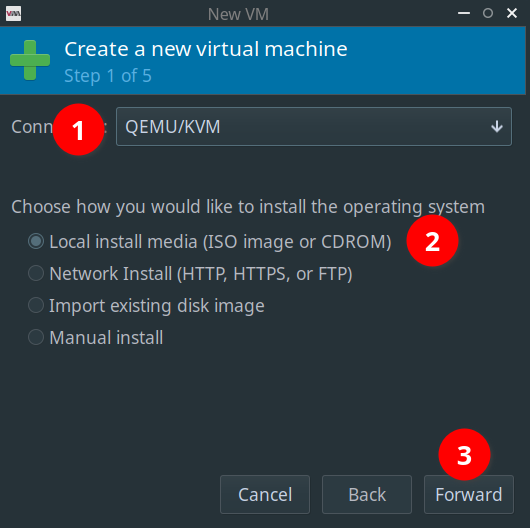
That would bring up a new window as shown below. First, we need to select QEMY/KVM as the connection type. Then select Local install media (ISO image or CDROM) and move forward.
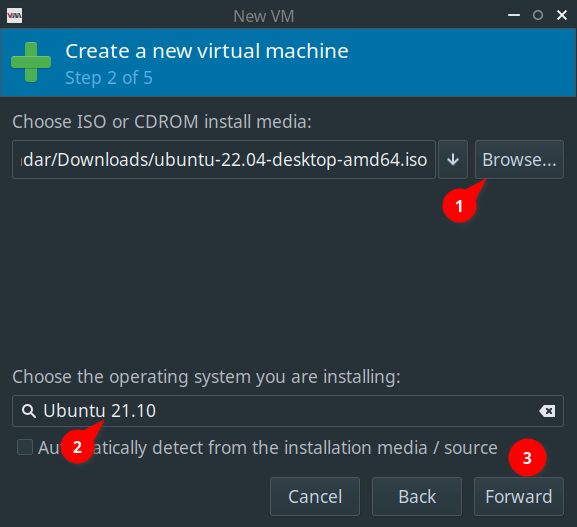
In the next option window, we need to select ISO and Linux OS or Distro type. There is also an option to detect the OS type automatically. So, I selected the auto option. However, Virt-Manager could not detect the latest ISO automatically and showed me this error.
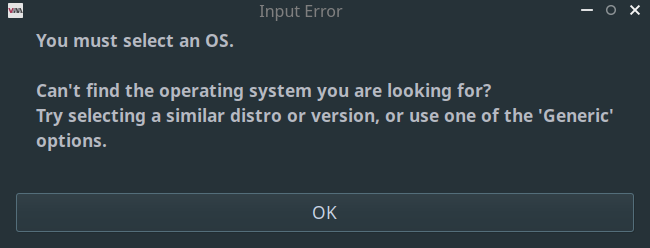 Error Detecting Ubuntu ISO Automatically
Now, I had to select the closest Ubuntu version i.e. Ubuntu 21.10. After this, the options window will look like this:
Next, we need to allocate our hardware resources to Virtual Machine Guest OS. It depends on your host OS resource usage. I have 8 processors and 16GB RAM. Therefore, I have provided half of the hardware resources which include 4 processors and 8GB for Ubuntu Guest OS.
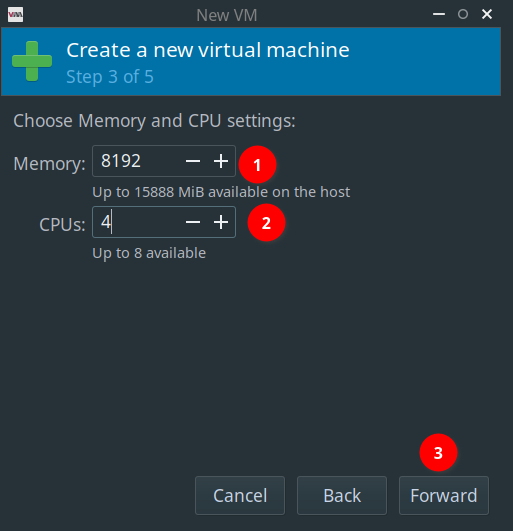 Provide No of Processors and RAM to VM
In the next window, we need to select HDD space for our Guest OS. You can use either the default location or manage it to point to other filesystem directories. If you have enough space in your root partition, then choose default. I wanted to save the Guest OS file to a different partition. Hence I have chosen Manage.
Selecting Manage brings in to the below option where you can add a new filesystem directory. I created a separate directory called ubuntu22.04 in the target location and allocated 50GB for Guest OS. Finally, your location option should lead to your custom directory.
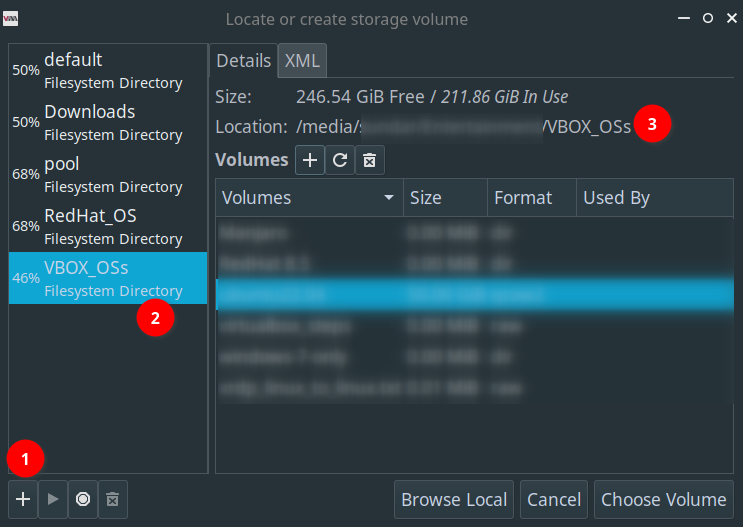 Choose Custom Location HDD Space
After choosing the HDD space, the final window will look like as shown below screenshot. Ensure that your storage path is correct, select the default option for the network under NAT and click the finish button.
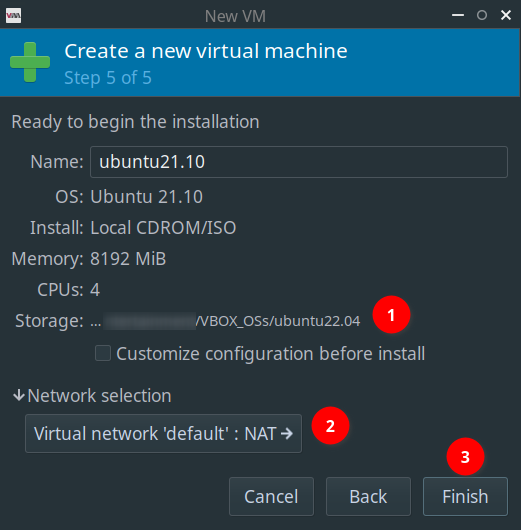 Review New Guest Virtual Machine Options
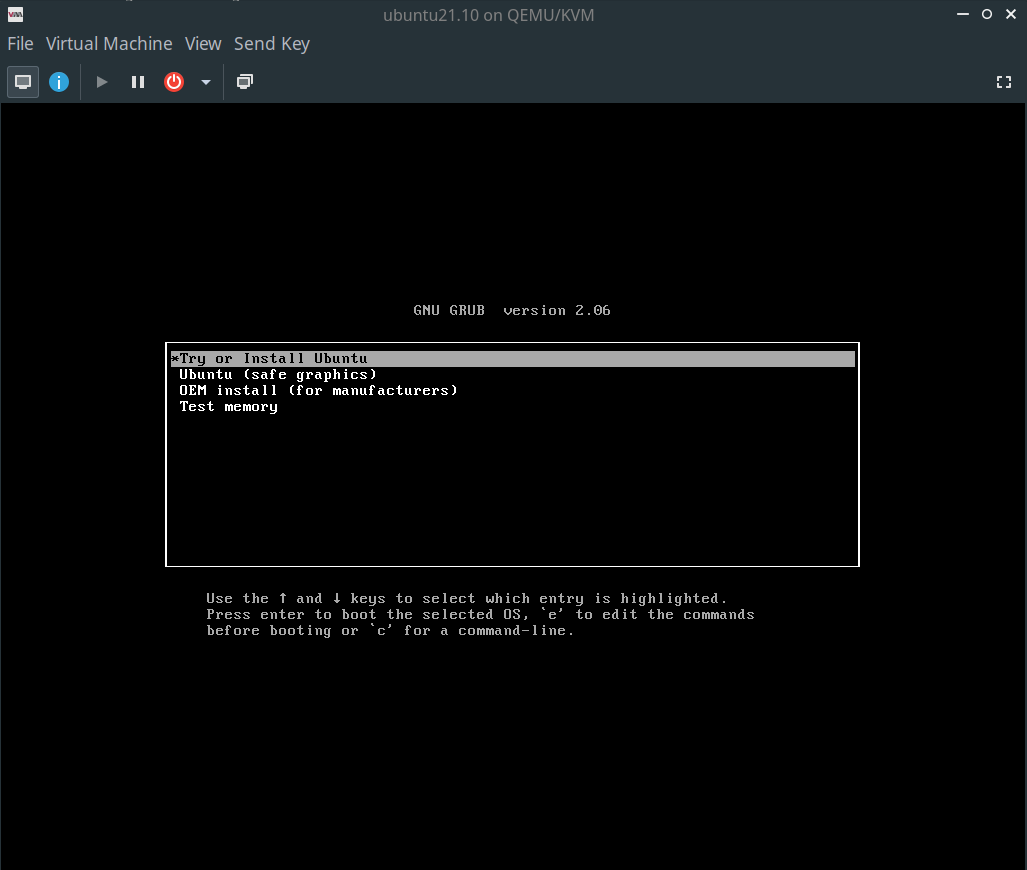
Immediately after clicking on Finish, the Virtual Machine booted from Ubuntu ISO as shown below.
There is one good thing I have observed is that the Guest OS screen was initially restricted to limited space within the VM viewer before installing Ubuntu Guest OS. This you can see in the below image in which arrow free space is indicated with arrows.
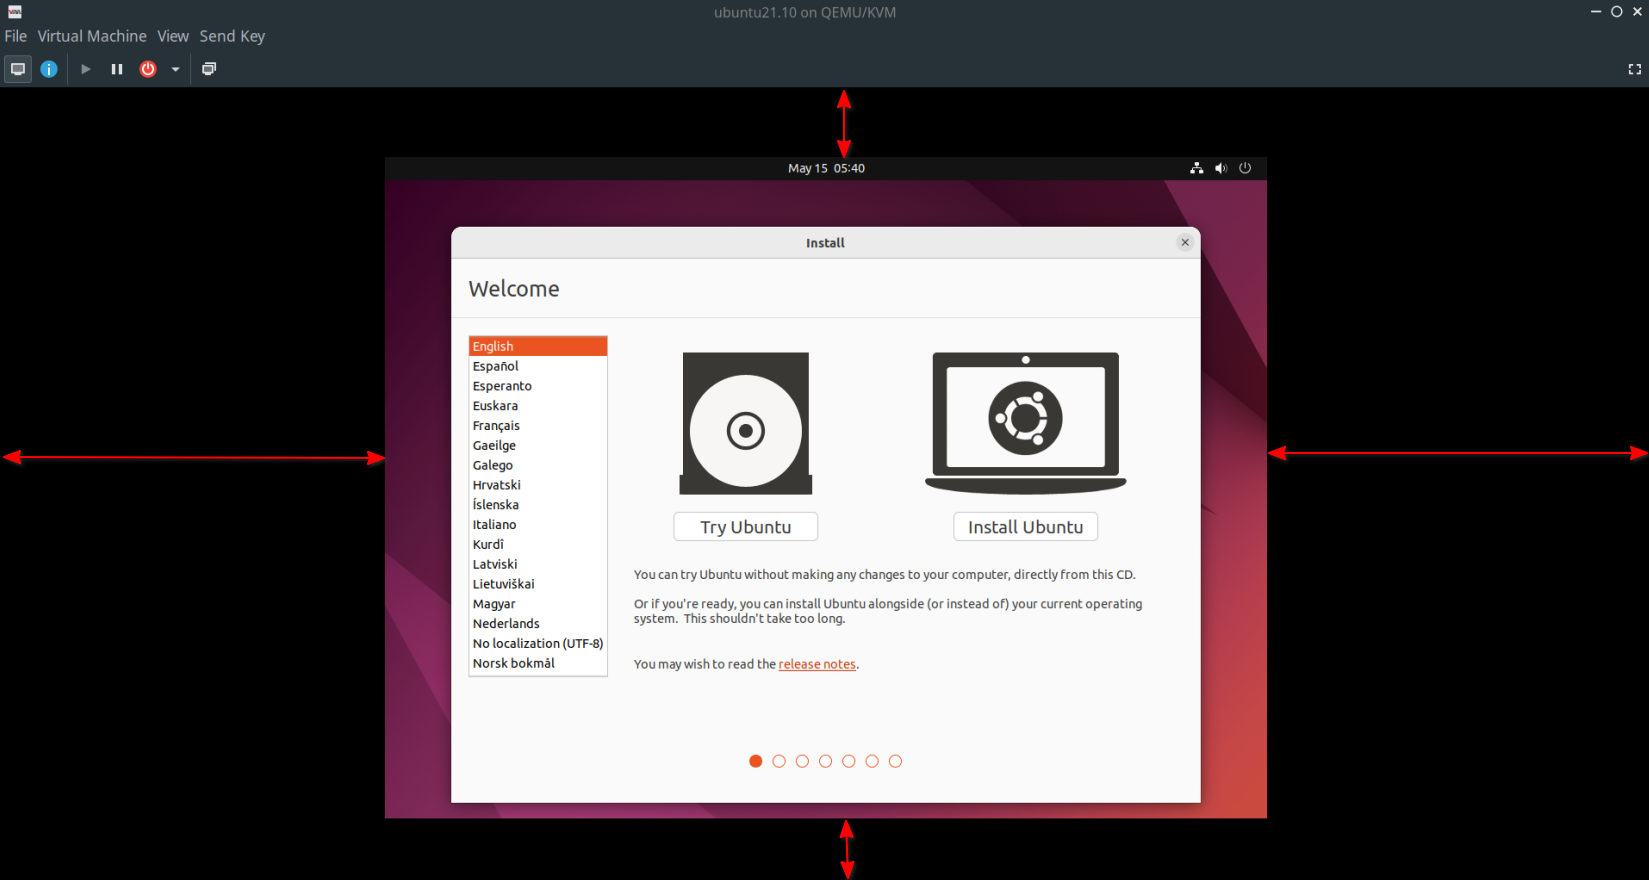 Ubuntu Guest VM Viewer Before Install
However, after installing and rebooting Guest OS, it automatically adjusted to the entire VM viewer screen as shown below. That was good. The same is not possible to achieve under Virtual Box without further tweaking.
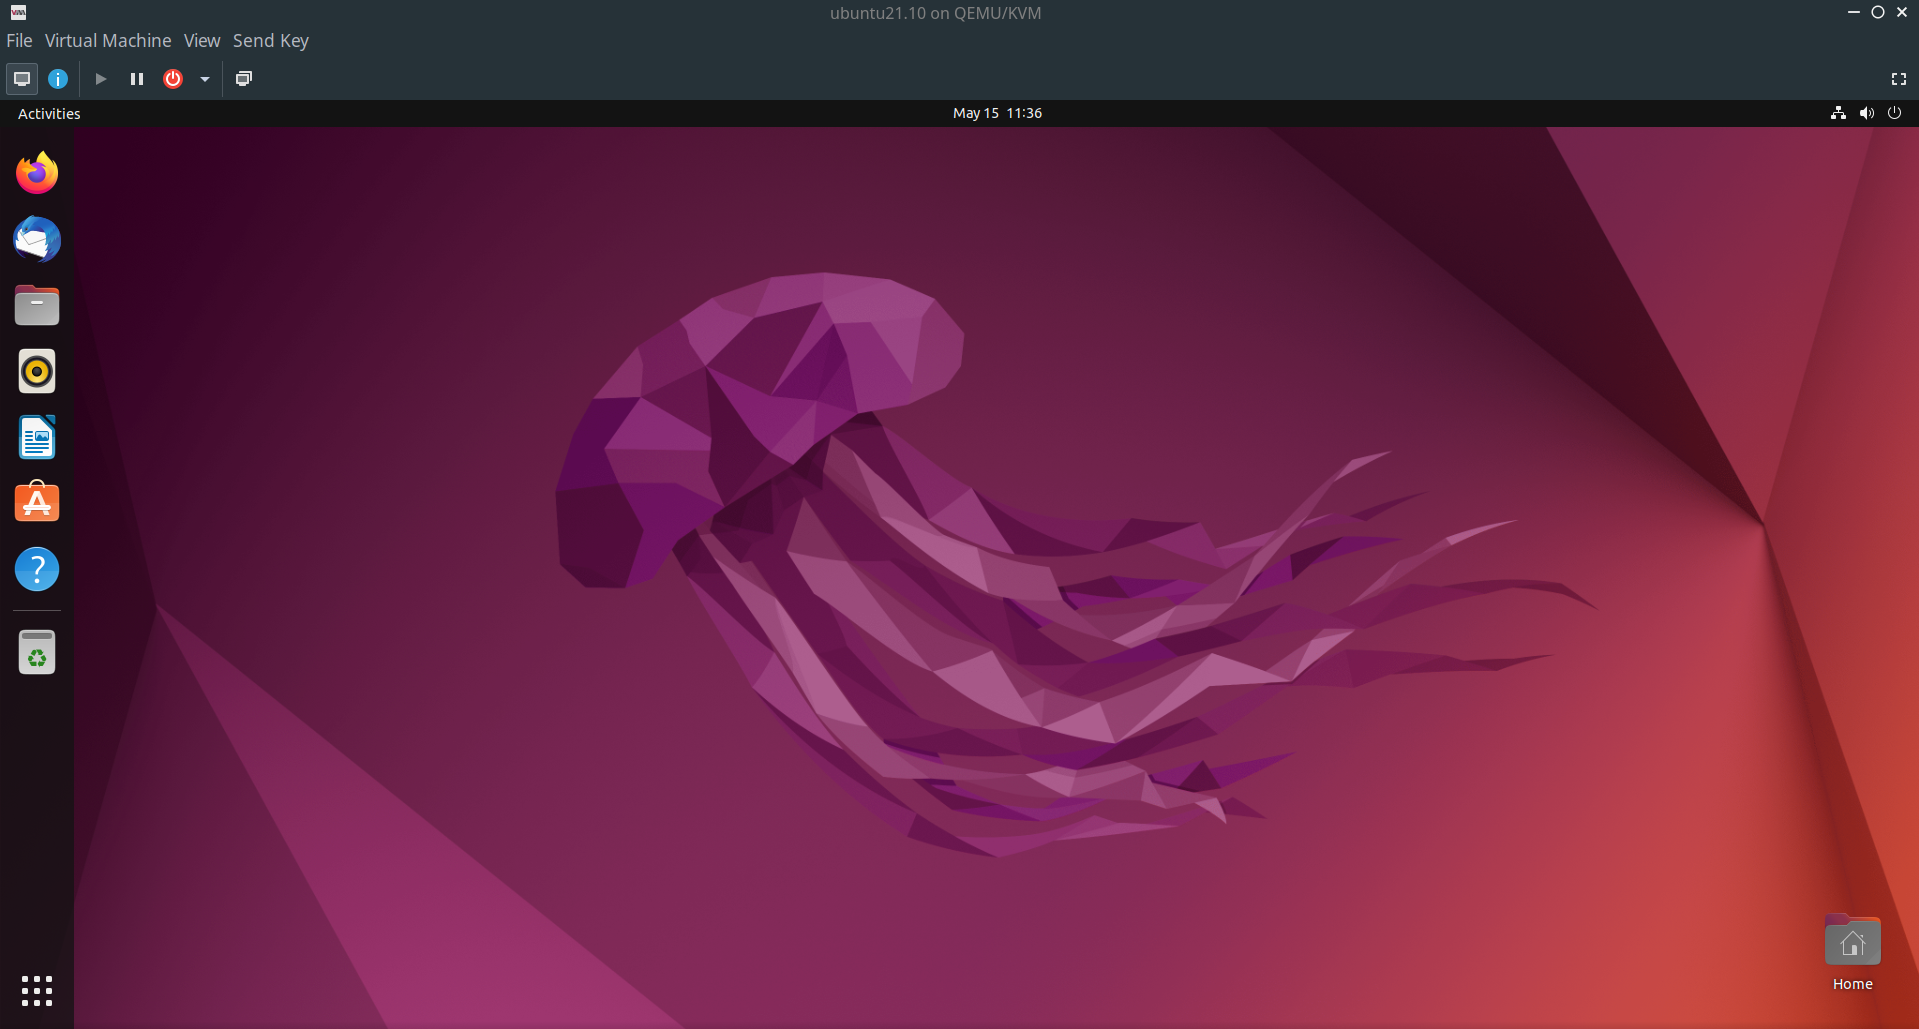 Ubuntu Guest VM Viewer After Install
Setting Up Shared Folder
This is the difficult part I have encountered during the entire process of configuring Guest OS. Unlike Virtual Box, there is no straight way to insert a folder to share files between Host and Guest OS. The official documentation is too cryptic for beginners. After some research, this is the solution I found. This requires you to perform certain actions both in Host and Guest OSs.
On Host OS
We will share a directory called shared from Host to Guest OS. So create a directory and provide the necessary permissions.
1
2
$ mkdir ~/shared
$ sudo chmod 777 -R shared/
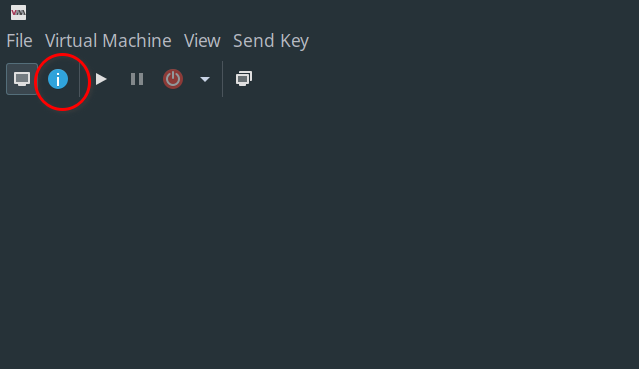
The shared directory was given all rights to avoid read-only errors from Guest OS. Now open the Virtual Manager viewer for Ubuntu Guest OS and click on the Show Hardware Details option as shown in the below image.
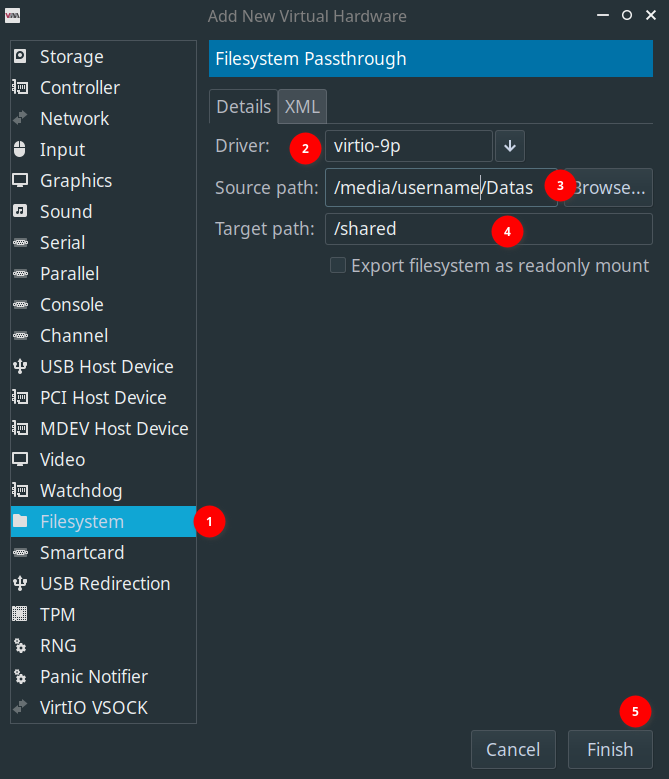
Here we need to set certain options in appropriate locations. Click Add Hardware. Under File System –> select virtio-9p filesystem driver –> provide your Host directory path which you need to share with Guest –> /shared as target path –> click Finish and close the window. Your options should look like the below.
On Ubuntu 22.04 Guest OS
We will be mounting the Host shared folder under ~/shared directory on Guest OS as well. Now, boot your Guest OS and issue the following commands.
1
2
$ mkdir ~/shared
$ sudo mount -t 9p -o trans=virtio /shared ~/shared
The above command is to be issued every time you boot into Guest OS.
Now onwards you should be able to access all host files under ~/shared on Guest OS. I tried adding some files under Host OS and accessed them via Guest. Again, created a test file on Guest OS and accessed it from Host OS. I also tried sharing NTFS and FAT filesystem to Guest and it worked flawlessly.
Guest OS Performance and Opinion
The Good
After I installed Ubuntu 22.04 as Guest OS on Virt-Manager, I played around to see its performance. There is no way I can quantity at the moment but the performance seems to be better. There are no lags whatsoever I observed while using the Guest OS. It connected to my Host network and I was able to browse the internet without any issue. While moving around the terminal window and file manager windows through mouse drag, I did not find any lag or pixelisation. I installed a few software, removed some, upgraded OS and all worked nicely.
The bidirectional sharing of clipboard content also worked without an issue. I would say that except for the setting up of a shared folder, the rest all worked out of the box.
The Bad
The biggest issue I found while using Virt-Manager was sharing data between Host and Guest OS. Here, I am not considering the difficulties involved in setting up a shared folder. I copied a directory from Host OS to ~/Documents under Guest OS and measured the time taken to complete the process. The size of this directory is 2.5GB and it contains 17,557 files under various subdirectories. I performed this operation on both Virt-Manager and Virtual Box. Here is the test result:
- Virt-Manager took 16.32 Min
- Virtual Box took just
07.17 Min
That is a very bad result for Virt-Manager and did not expect such a poor performance from software maintained by Red Hat.
The biggest issue I found is the lack of documentation. Both official and other technical blogposts are not having enough information that will be helpful for new users. Even the blogposts are also too technical to understand immediately and are aimed at intermediate or advanced users.
My Final Take
The Virt-Manager software is officially supported by Red Hat. It is not surprising considering that the KVM itself is supported by the same company. While setting up Virt-Manager, I read a comment posted by a Red Hat engineer while responding to a user in their official forum telling that the Virtual Box for installing Red Hat OS as Guest is not required. They also recommended installing Red Hat Enterprise Linux (RHEL) into Virt-Manager for better performance. I installed RHEL after I set up Ubuntu Guest OS. The performance of RHEL as a Guest OS is also almost the same as Ubuntu 22.04 Guest OS.
Considering the process involved, the learning curve required, and poor performance in sharing of data between Host and Guest OS, I will not recommend the Virt-Manager method for installing Guest OS to beginners or alike.
You can download this article from here for free.

