Install Ubuntu on VirtualBox and Configure it Properly
Virtual Machine
As the name suggests, a Virtual Machine is a software that emulates your real hardware. This will enable you to install an Operating System within your Host Operating System. The utility of this Virtual Machine depends on the way you want to use it or configure it. For example, there may be software that only works on Windows-based OS but you have the right to use only Linux-based OS in your organisation. In such a case, you can install a Windows OS within Linux through Virtual Machine software.
The main reason why I use Virtual Machine is due to Micro Soft Office Products. Whenever I work on Word or Presentations which required to be shared with others, I fire up my Windows Virtual Machine, use MS Office, and shut down. In addition, I also use Virtual Machine for testing various Distro and to test my pet projects. There are quite a few options available to choose Virtual Machine software, both paid and free. However, for personal and general-purpose, I recommend using the following:
- VMware Workstation Player
- Quick EMUlator (QEMU)
- Virt-Manager
- VirtualBox
Why VirtualBox?
I have written an article about Virt-Manager and you can read it here. Here are the main reasons I choose VirtualBox over other Virtualisation software:
- Cross-platform (Linux, Windows, and Mac OS)
- Rapid development cycle to support the latest OSs
- Many options are free for personal use
- Free
- Superior documentation
- Help from the community
What I Intend to Accomplish
The main intent is to install Ubuntu 22.04 as a Guest OS and share directories and files between the Host and Guest OS. Following are the VirtualBox operations I intend to perform in this tutorial:
- Install VirtualBox and other additional software on Host OS (Arch Linux)
- Allocate more processors
- Allocate more memory (RAM)
- Manual adjustment of HDD
- Bidirectional clipboard sharing
- Network sharing between Host and Guest
- Boot and install Ubuntu from ISO files
- Install necessary software on Guest OS for better performance
- Configure Host and Guest for sharing of files between
This tutorial is a lengthy one from installing VirtualBox to enabling file-sharing options. There are lots of screenshots I have posted here for beginners to understand. I believe this one guide is enough to configure VirtualBox software for better performance and get you started with Virtual Machine.
Install VirtualBox on Host OS
My Host OS is Arch Linux with up-to-date packages. We need to install three core components to make VirtualBox more user-friendly. I use the linux-lts kernel on my machine and accordingly, the following three packages are to be installed. While virtualbox-ext-oracle can be downloaded directly from the VirtualBox website, I preferred to install it from AUR and I never encountered any issues so far. I used paru package manager instead of pacman as it would pull AUR packages as well.
1
2
3
$ paru -S virtualbox virtualbox-host-dkms linux-lts-headers
$ paru -S virtualbox-guest-iso
$ paru -S virtualbox-ext-oracle
After installing core packages, the virtualbox driver is to be loaded. Execute the following command in the terminal:
1
$ sudo modprobe vboxdrv
Now add vboxusers to the group.
1
$ sudo usermod -aG vboxusers $(whoami)
We also need to install the
linux-headerspackage on Ubuntu Guest OS. That will be done in the latter part of the tutorial.
Download Ubuntu 22.04 ISO
Before we proceed further to tweak the virtualbox, we need to download the latest Ubuntu 22.04 ISO from Ubuntu’s official website. Go to https://ubuntu.com/download/alternative-downloads and scroll down to section BitTorrent and download torrent file for Ubuntu 22.04 LTS. I recommend this method as the speed of download through torrent is much faster than a direct download. The ISO file downloaded is ubuntu-22.04-desktop-amd64.iso and located in the ~/Downloads directory.
Create Virtual Machine for Ubuntu
In this section, we will create a new machine and install Ubuntu 22.04 as a Guest OS. Before installing, we need to create a Virtual Machine for our Guest OS.
If your VirtualBox GUI is looking ugly under KDE dark mode, you can use the
virtualbox -style Fusion %Ucommand from the terminal.
Before Install
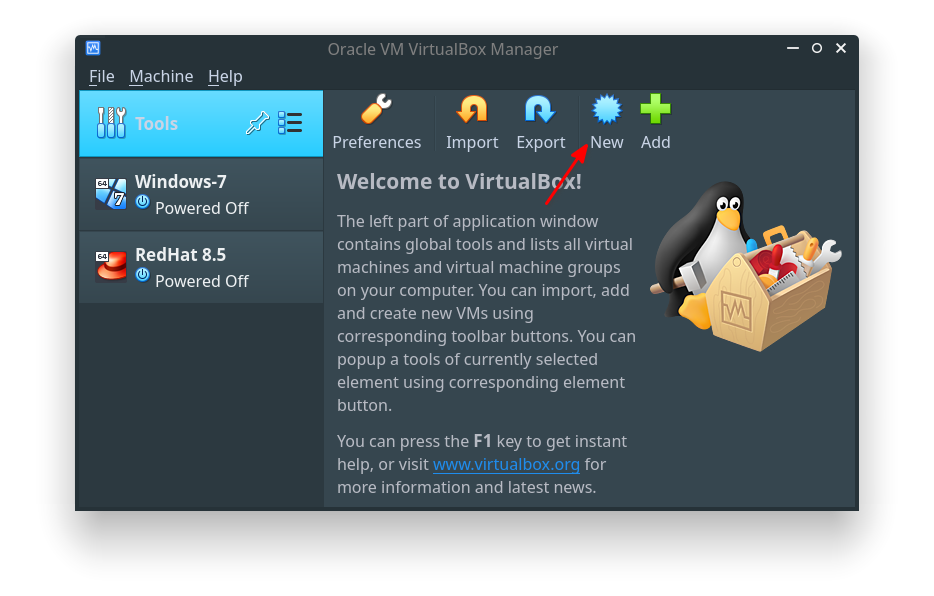
When you open VirtualBox GUI, this is what it looks like.
Clicking on the New button will bring a new window as indicated below that will guide you through allocating various hardware to the Virtual Machine. In the first screen, we need to provide the name of the OS, and the location of the machine folder where all Guest OS files will be located. You can manually locate the local directory by clicking on the drop-down option against the Machine Folder option. Ensure that you provide a path that has enough space. Then click Next.
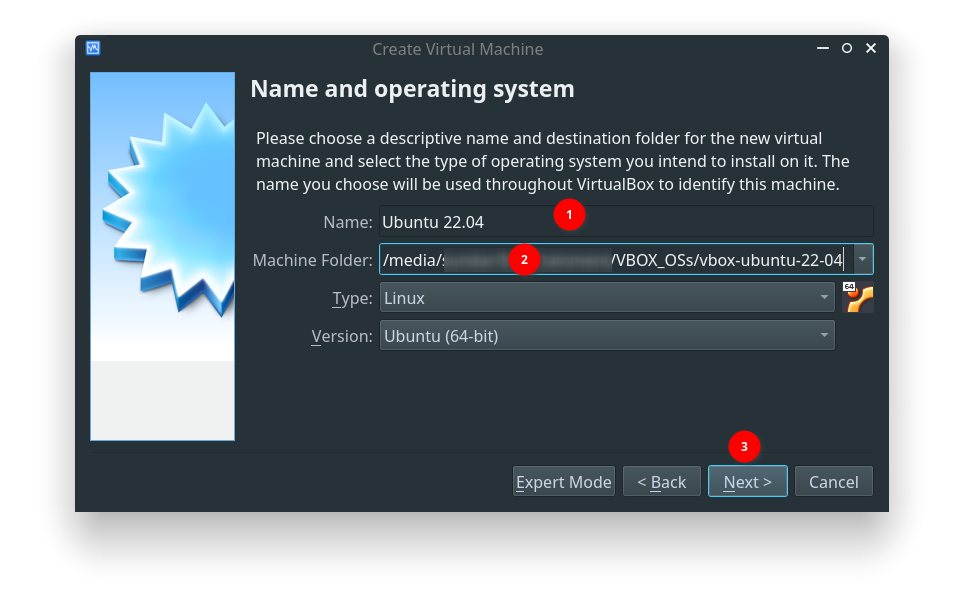 VirtualBox: Add New Virtual Machine
In the next window, allocate the necessary RAM size. Remember that whatever you provide here will not be available for your Host OS. The minimum recommanded RAM size is 2GB. But I am providing 8GB as my system has 16GB RAM.
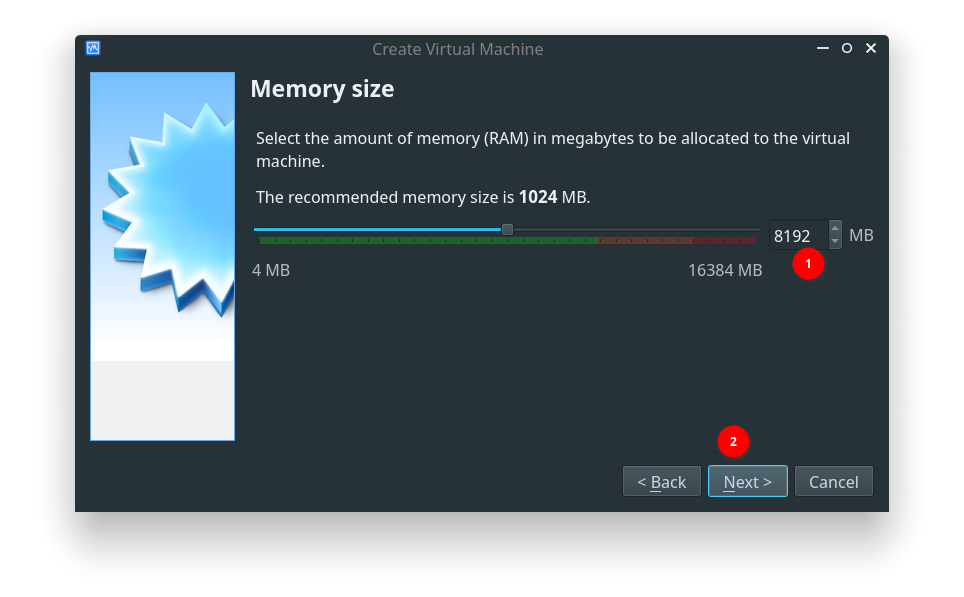 VirtualBox: Provide Desired RAM Size
Next, we need to create a hard disk for our new Virtual Machine. Select the Create a virtual hard disk now radio button and click on Create.
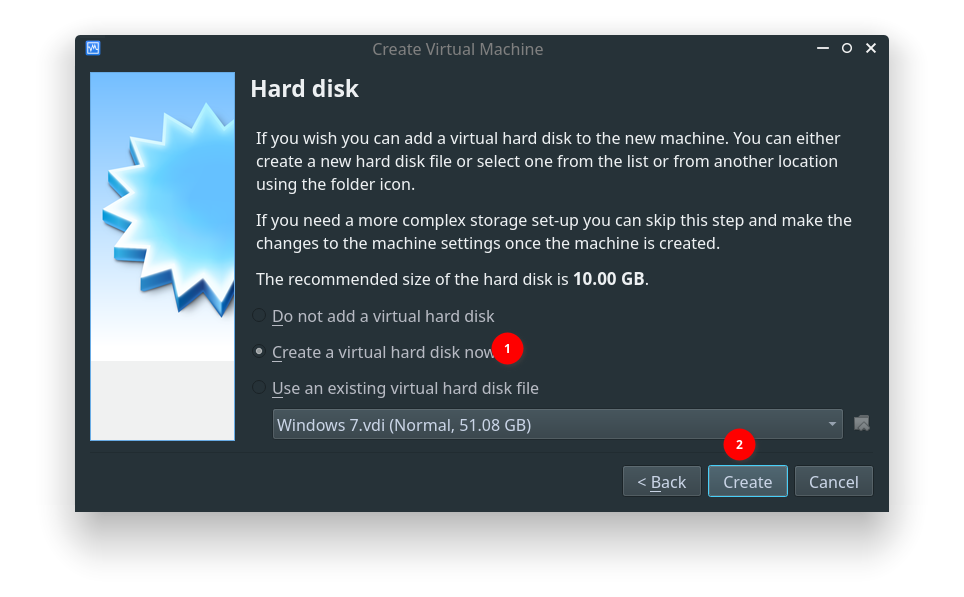 VirtualBox: Create New Virtual Hard Disk
In the new window, choose the VDI (VirtualBox Disk Image) option and click Next.
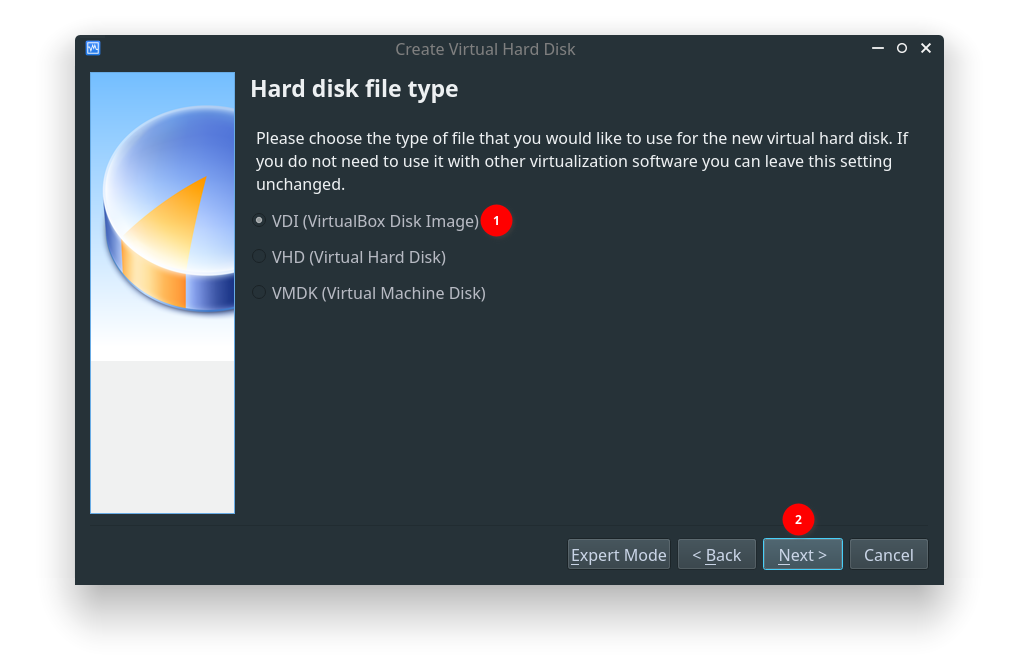 VirtualBox: Choose Hard Disk Type
Now, we need to select how data is to be stored. The option Dynamically allocated will not create the whole hard disk at one go and it will grow with Guest OS usage. The other option Fixed size will create the whole virtual hard disk file on a local directory which is not recommended. Therefore, we will select the Dynamically allocated option and click Next.
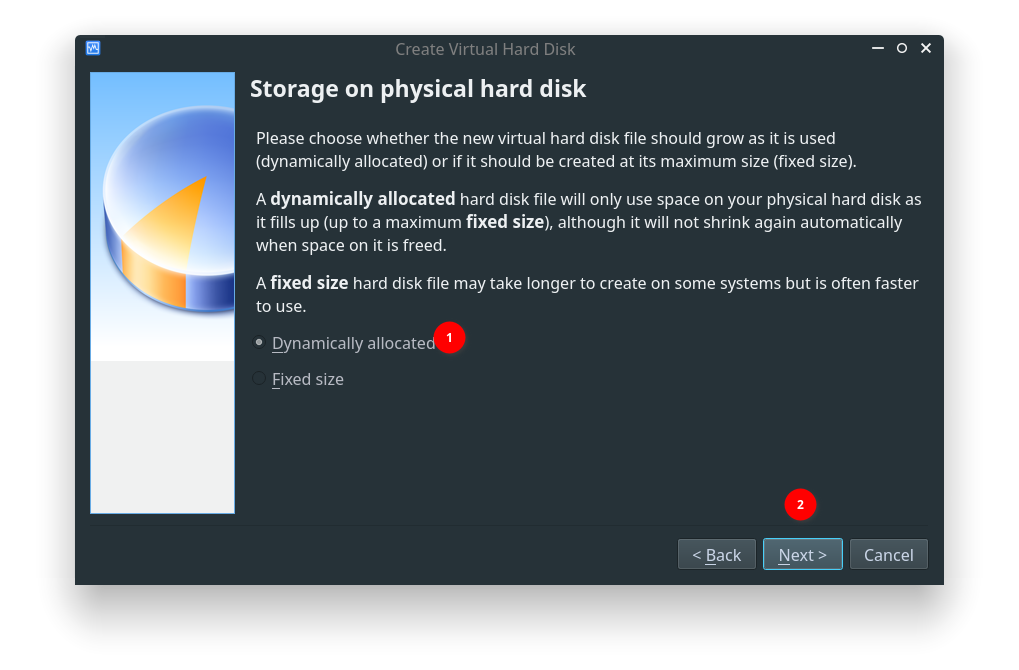 VirtualBox: Select Way to Store Data to Storage
That will lead to the next option to allocate virtual hard disk space for the machine. The path to the virtual hard disk file will be created automatically by the virtualbox. You can provide virtual hard disk space for the machine. The minimum recommended size is 20GB. I have given 50GB for Ubuntu 22.04. Once the size is provided, click on Create. This will create the virtual hard disk file and close the wizard.
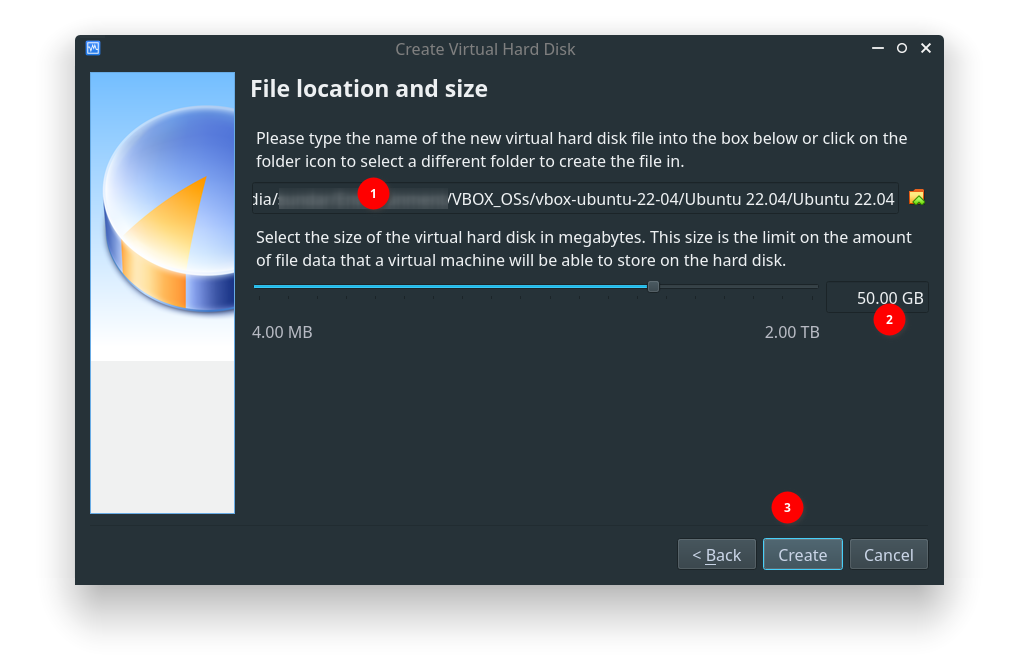 VirtualBox: Provide Desired Hard Disk Space for VM Ubuntu OS
After the Virtual Machine for Ubuntu 22.04 Guest OS is set up, it will return to VirtualBox GUI. Here you can see that a new entry for Ubuntu 22.04 is made.
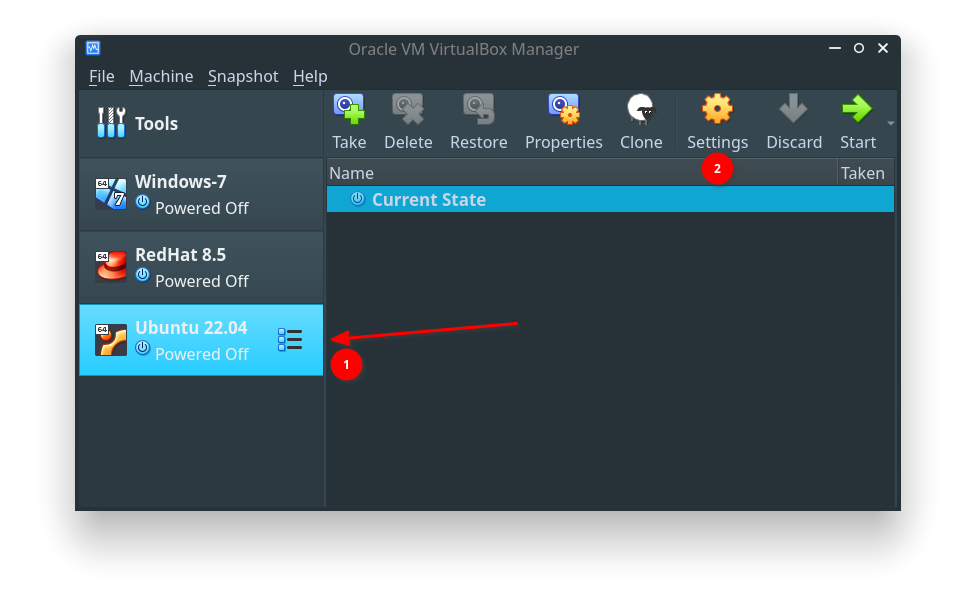 VirtualBox: View of VirtualBox GUI After Setting Up
Tweak Virtual Machine Settings
There are a few more additional settings that need to be tweaked so that we can install Guest OS and improve its performance. Firstly, select Virtual Machine Ubuntu 22.04 from the left panel and click on the Settings option. That will bring up the below settings window. Here we can tweak more options for Guest OS and insert Ubuntu 22.04 ISO for installing from it.
Firstly, under the General –> Basic tab section, ensure that name of the machine is mentioned as Ubuntu 22.04.
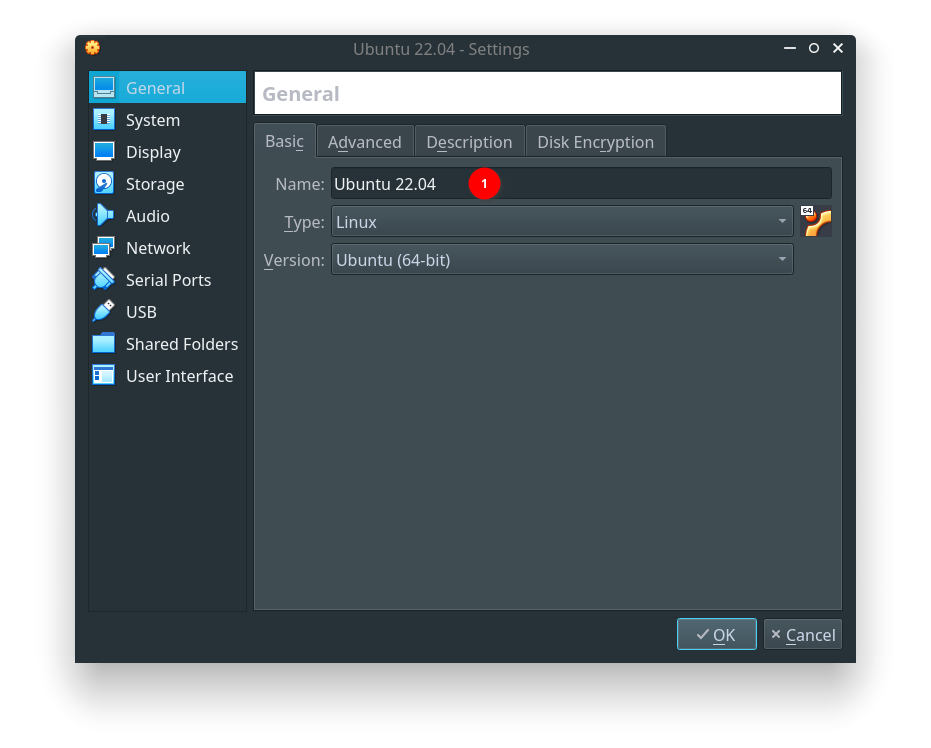 VirtualBox: Settings: General Basic Options
Under the General –> Advanced section, we can tweak the clipboard copy-paste between Host and Guest OS. Select Bidirectional for both Shared Clipboard and Drag’n’Drop option as shown below.
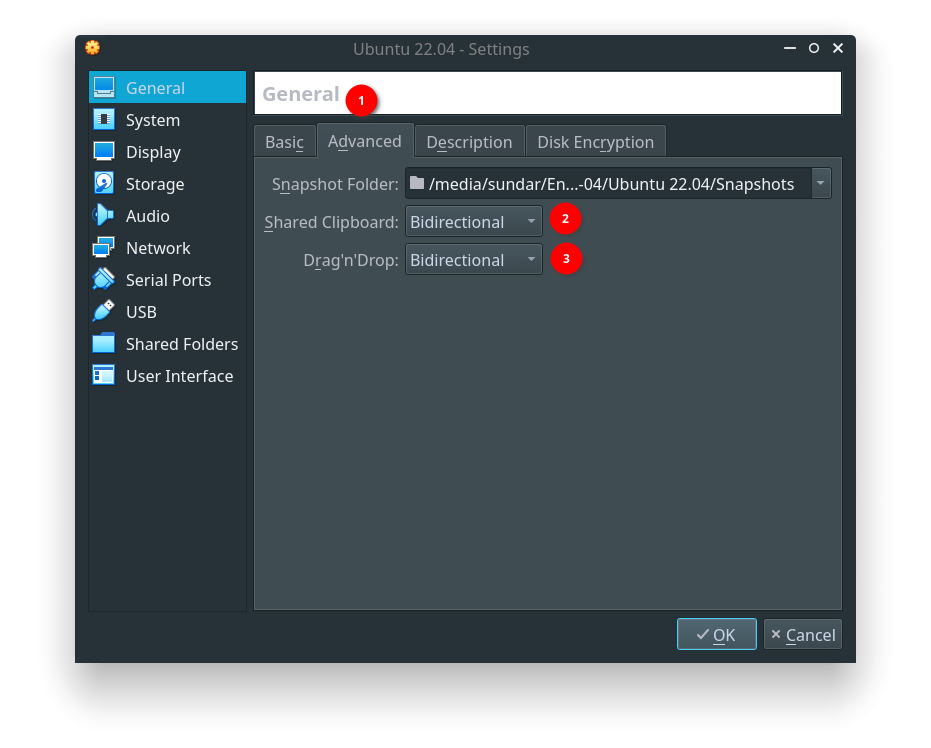 VirtualBox: Settings: General Advanced Options
Then go to System –> Motherboard tab and deselect Floppy from the boot order list as we won’t use it.
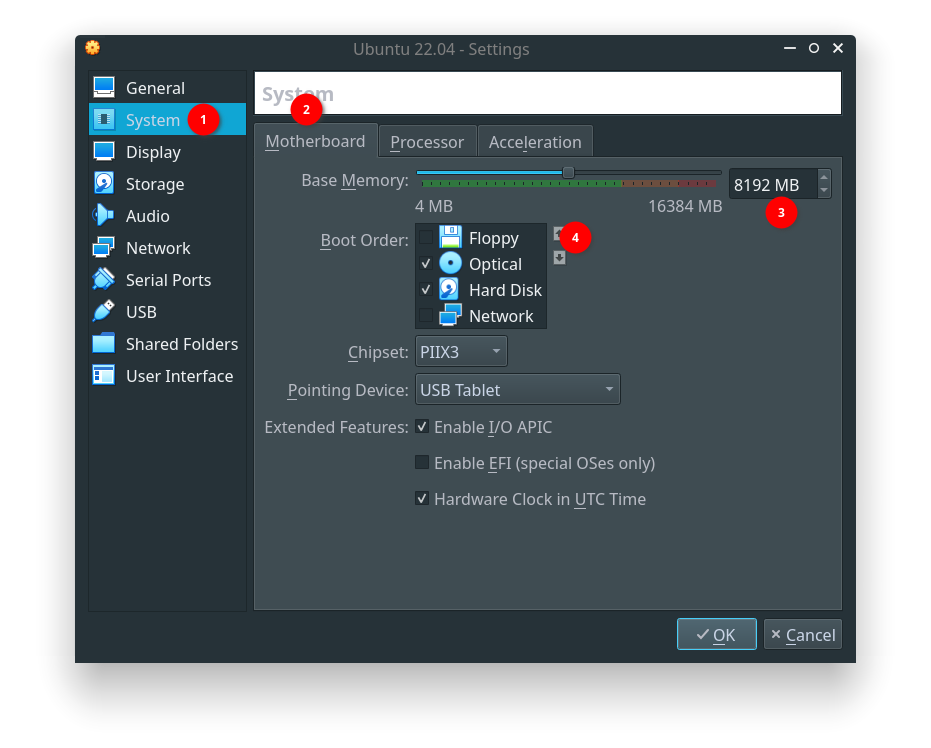 VirtualBox: Settings: System Motherboard Options
Move to System –> Processor tab and increase the number of the processor to your desired value. If you have 4 then give 2. I have 8 and hence given 4.
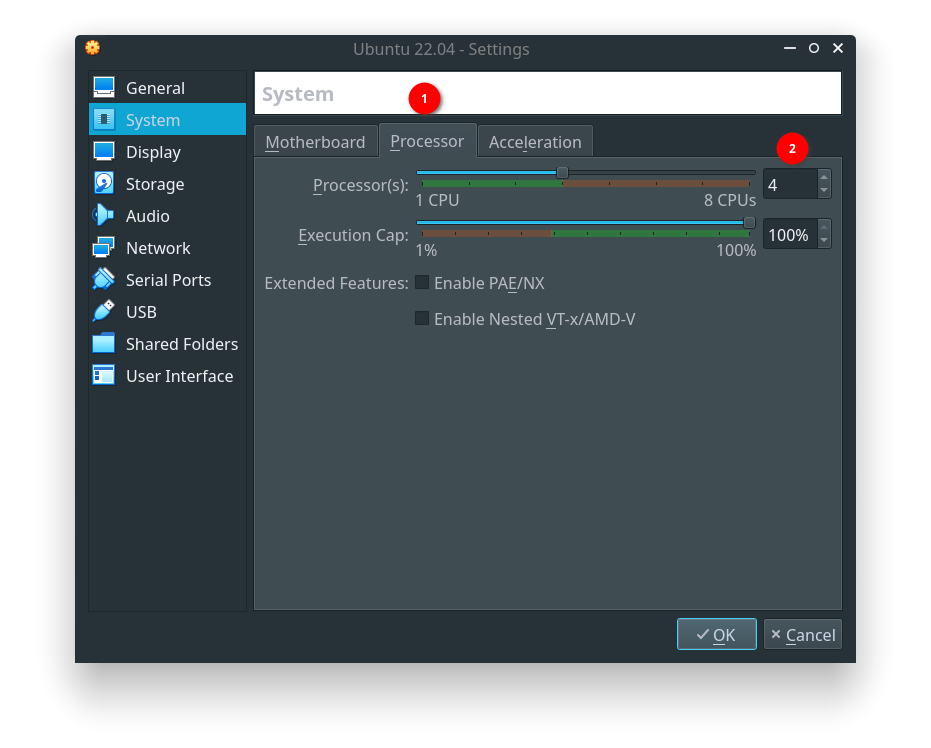 VirtualBox: Settings: System Processor Options
Under Display –> Screen, increase the Video Memory to the desired value. I allocated 64MB to Virtual Machine.
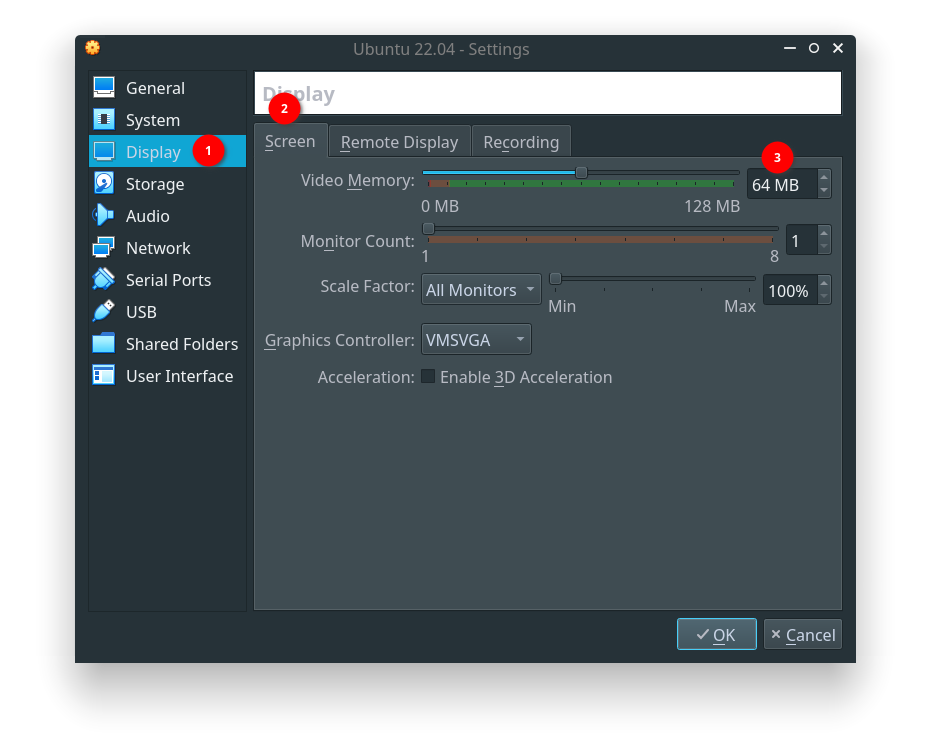 VirtualBox: Settings: Display Screen Options
Now we need to provide the path to our downloaded ISO as part of the storage devices. Go to Storage –> Storage Devices –> Controller IDE and click on the + symbol embedded in CD icon. That will open a new window for adding a new ISO to VirtualBox.
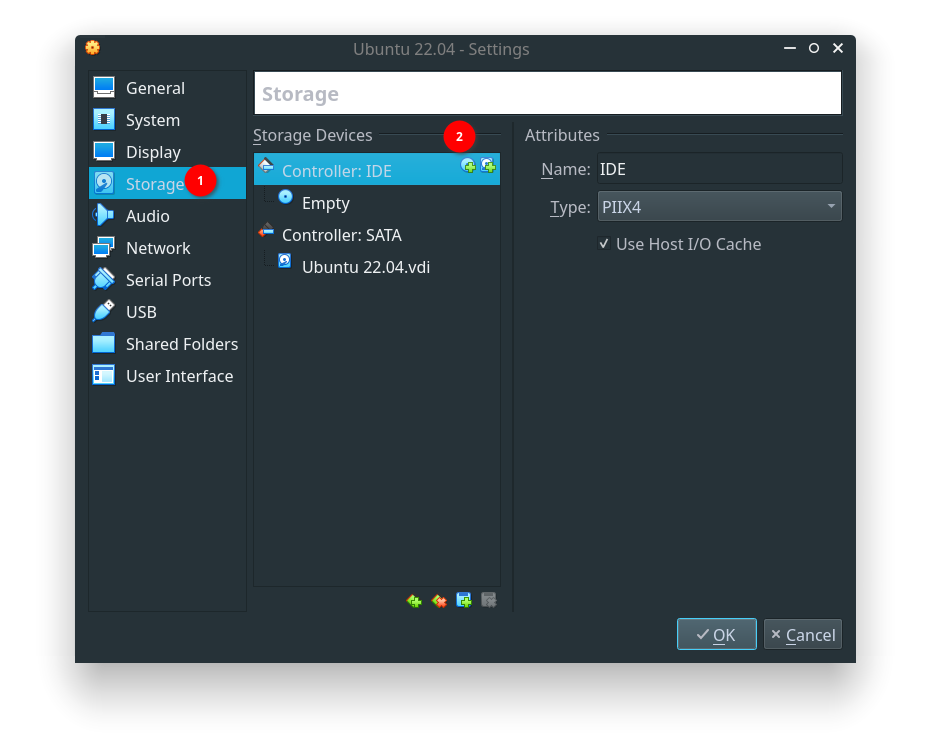 VirtualBox: Settings: Storage Controller Options
In the Optical Disk Selector window, click on the + icon to open the file manager navigation window.
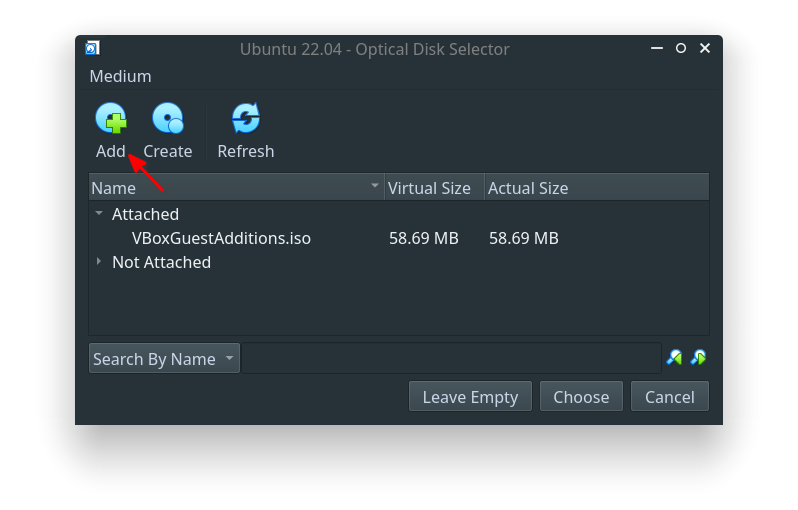 VirtualBox: Settings: Add An Additional ISO
Navigate to your download directory where your ubuntu-22.04-desktop-amd64.iso is located and click Open.
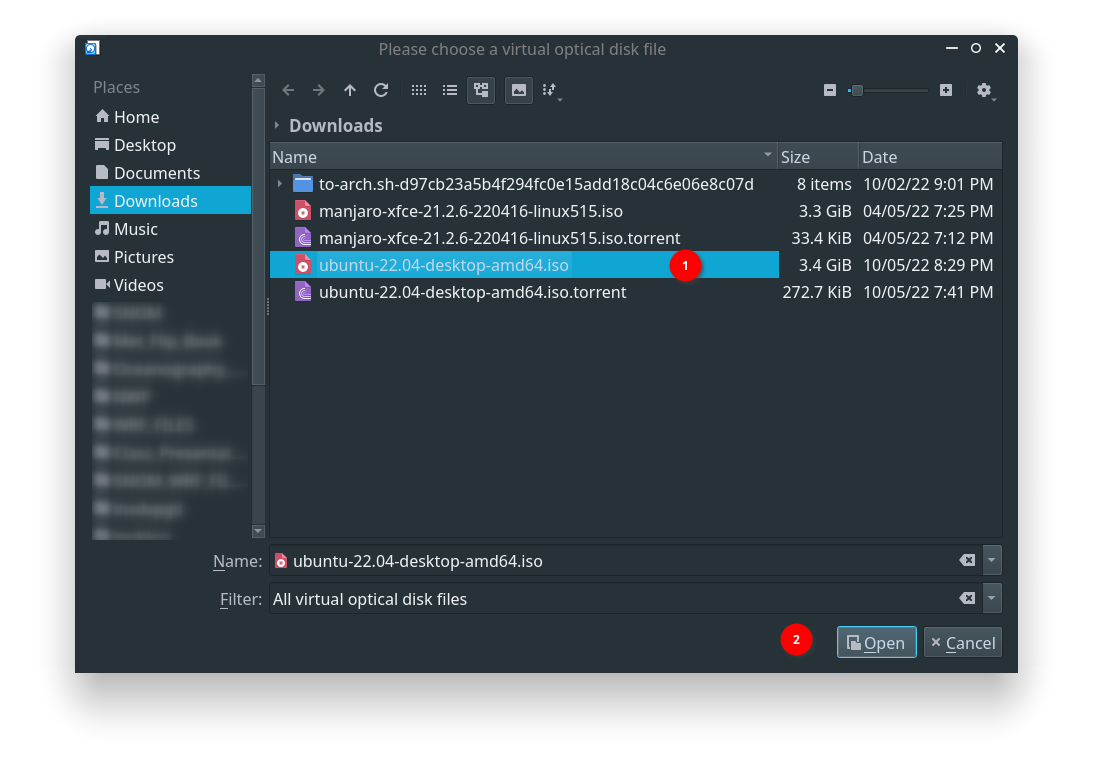 VirtualBox: Settings: Select ISO File From Local Directory
Now, you can see a new entry for ubuntu-22.04-desktop-amd64.iso that we have selected just now. Select ubuntu-22.04-desktop-amd64.iso entry and click Choose.
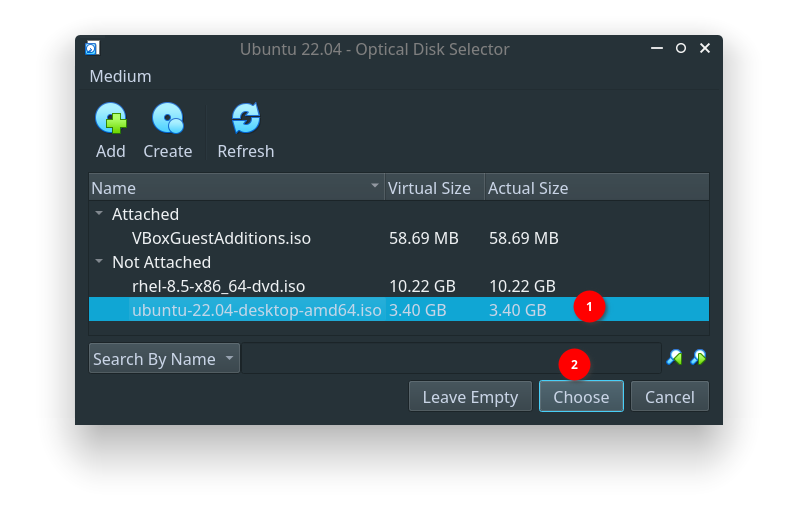 VirtualBox: Settings: Choose Desired ISO
After selecting the Ubuntu 22.04 ISO, you can see ISO is attached to Controller: IDE.
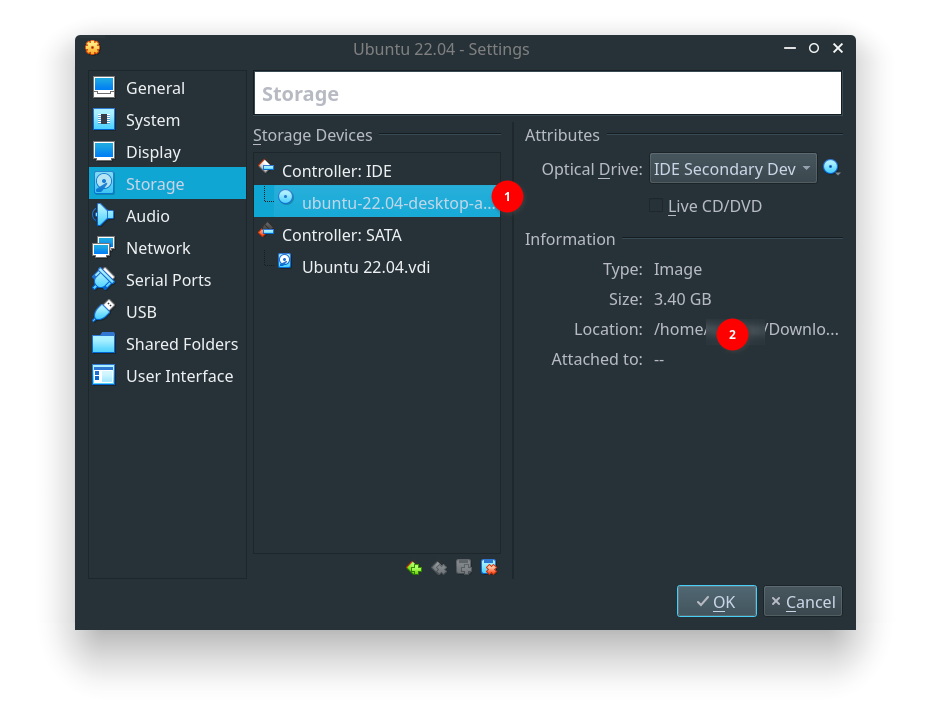 VirtualBox: Settings: Storage Controller After Attaching ISO
Now, go to Network –> Adaptor 1 tab and select NAT. For simple browsing and common internet-related option, NAT is more than enough. If you want to interact with Guest OS through network connect, then change this value to Bridged Network which will directly interact with your Host hardware.
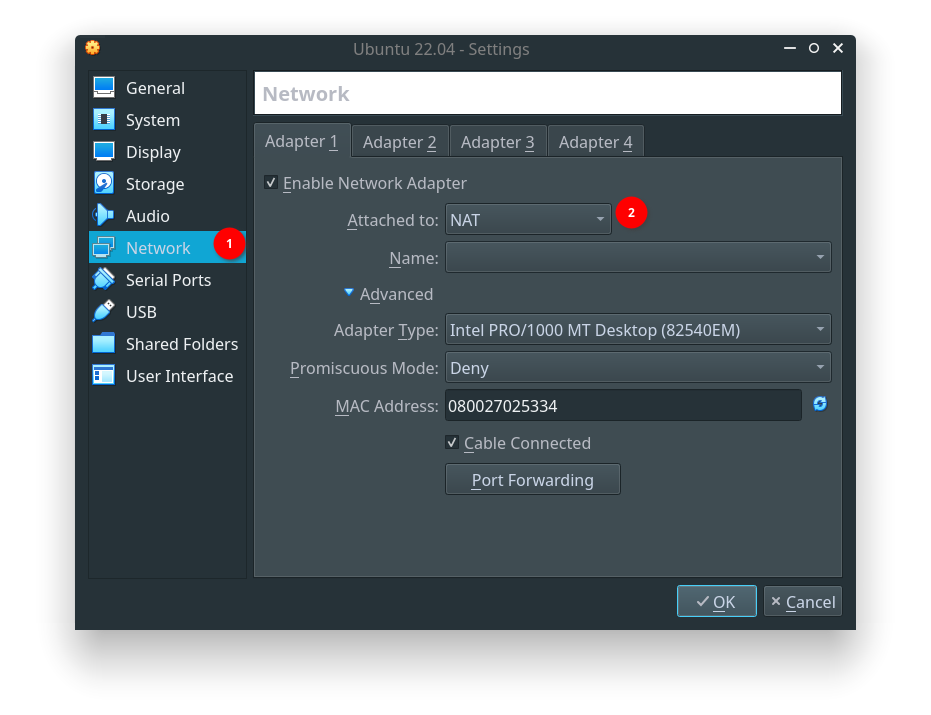 VirtualBox: Settings: Network Adopter Options
If you want Guest OS to access your Host USB devices, then go to USB and enable the Enable USB Controller option. In my case, I have disabled it as it always crashing my VirtualBox.
If you do not enable the
Enable USB Controlleroption, a warning message will display at the bottom of the settings window. You can simply ignore this warning.
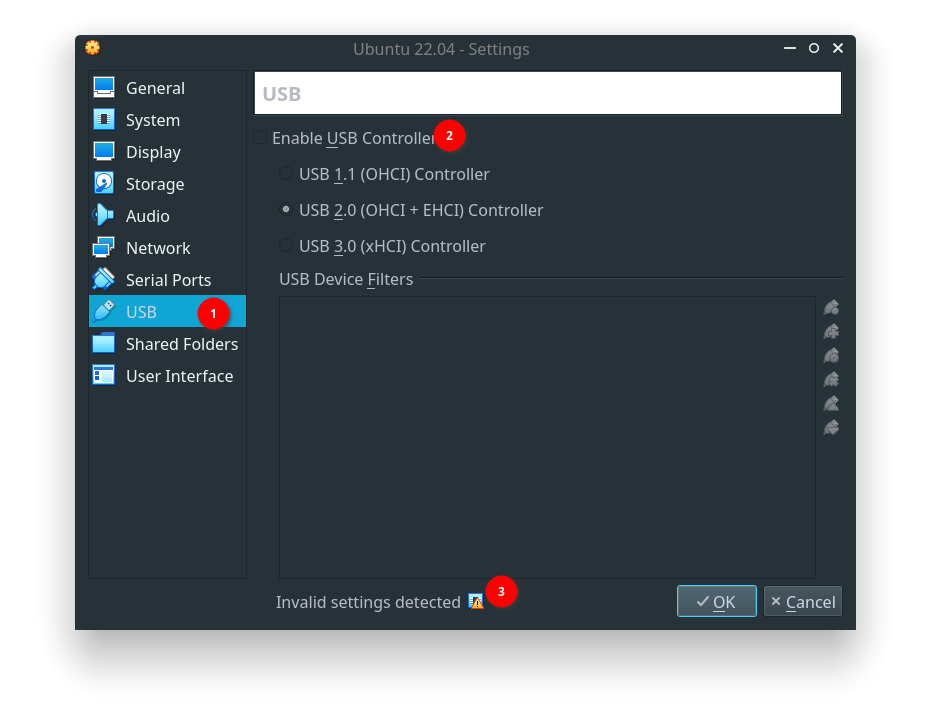 VirtualBox: Settings: USB Controller Options
You can also configure your shared folder right now before even booting your Ubuntu 22.04 ISO. For this, go to Shared Folder and click on the + icon as shown in the below image.
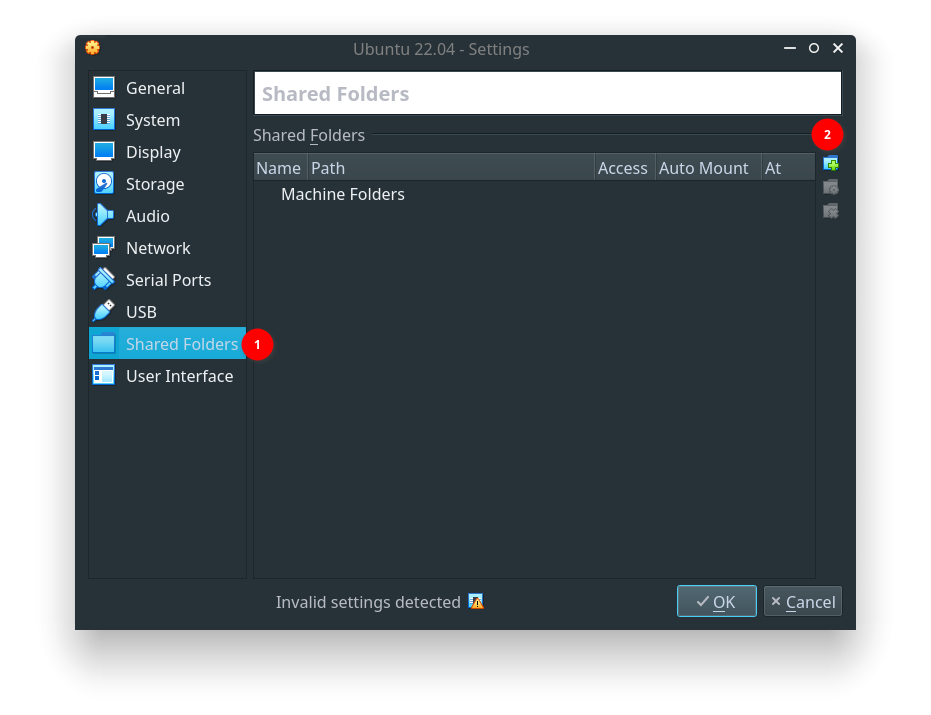 VirtualBox: Settings: Shared Folders Options
That will bring up another helper window where you can provide a path to the Host directory by navigating through the file manager dialog. Provide any name for the Folder Name that will be displayed on Guest OS. Do not forget to select the Auto Mount option. Finally, click Ok. You can add as many shared folders as you want.
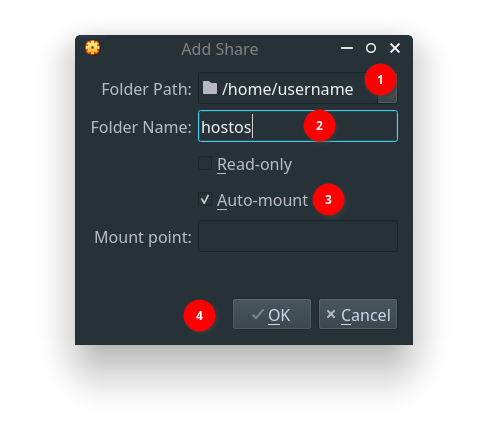 VirtualBox: Settings: Add Shared Folder Local Path
I have added three two-partitions and the Host’s home directory for sharing with Ubuntu 22.04 Guest OS. Once it is completed, you can click Ok which will also close the settings window.
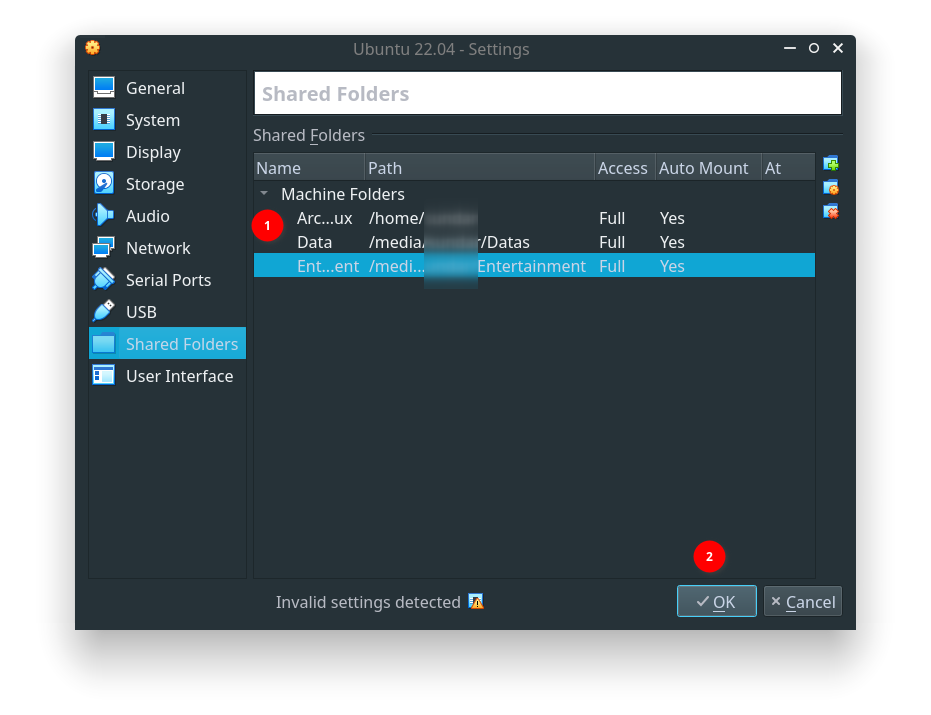 VirtualBox: Settings: Shared Folders PAth After Setting Up
That’s all. After enabling/ disabling various options, you can start the Virtual Machine by clicking on the Start icon as shown below.
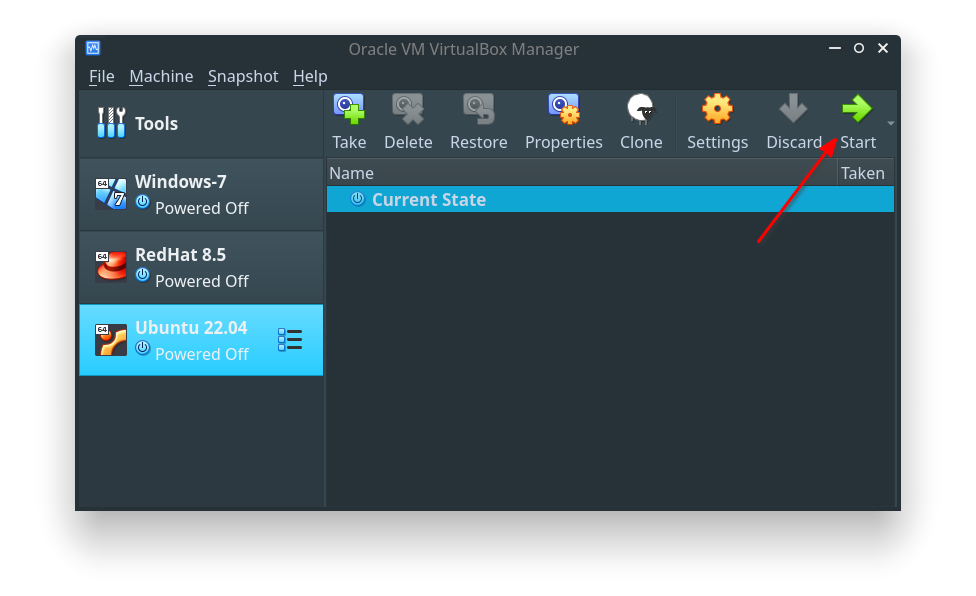 VirtualBox: Start Ubuntu 22.04 Guest OS
Ubuntu Install Procedures
Installing Ubuntu 22.04 on a Virtual Machine is a straightforward process. However, I will show here how I did on my Virtual Machine.
Starting the Ubuntu 22.04 Virtual Machine will bring in this GRUB Boot message. The select first option Try or Install Ubuntu option.
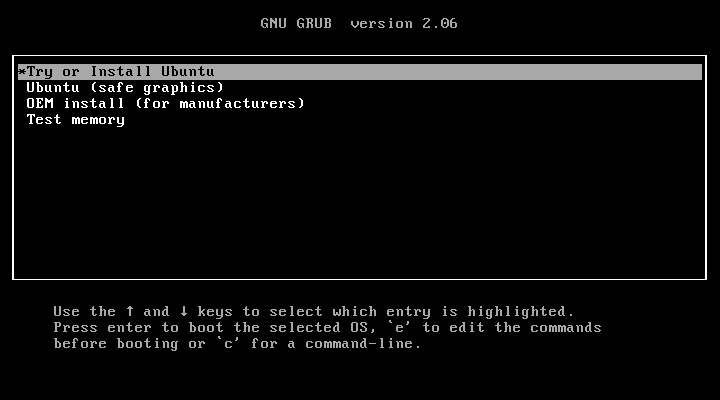 Ubuntu Install: GRUB Boot Menu
When Ubuntu boots in for the first time it will offer if you need to install or try live Linux. Select Install Ubuntu option.
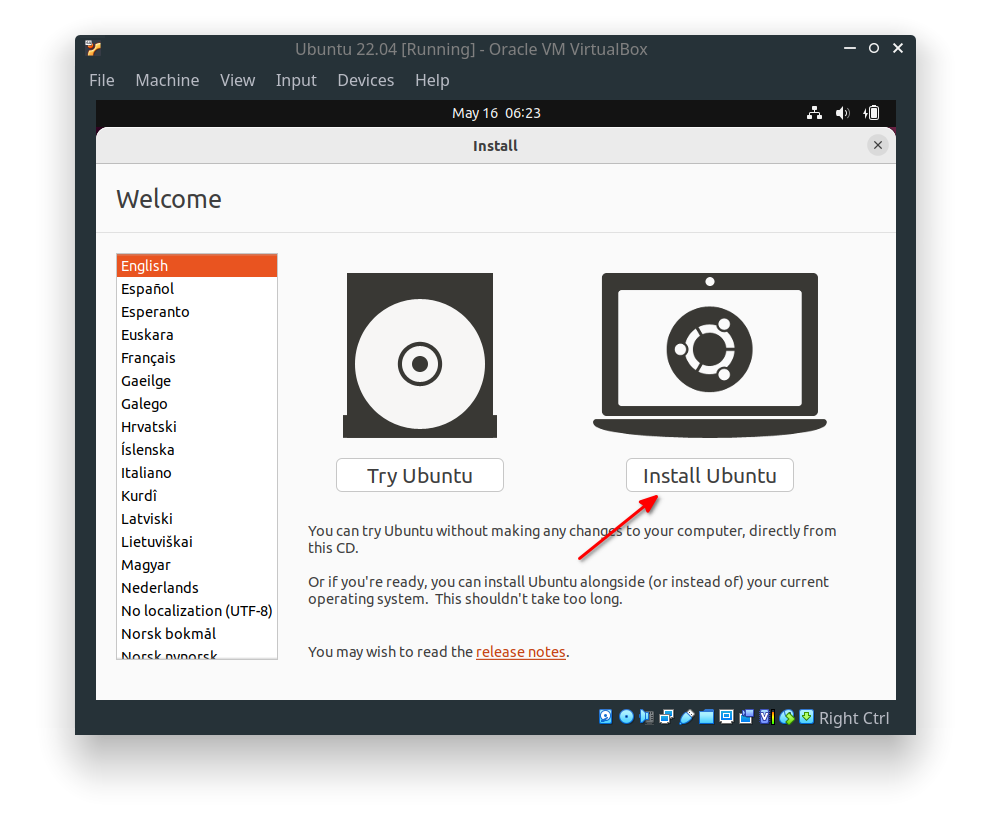 Ubuntu Install: First Boot To Try or Install
Select the English (US) option for the Keyboard layout and language option. This is not to be confused with the language Indians speak. Though Indians speak UK English, the keyboards we use are from the US.
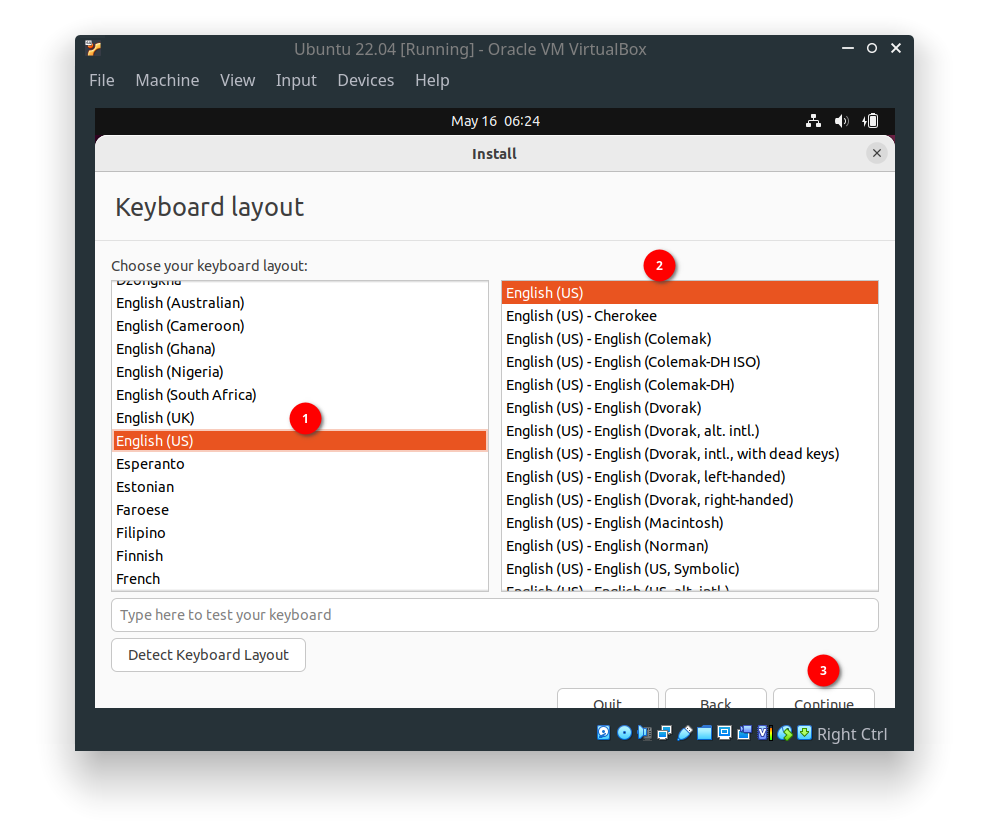 Ubuntu Install: Keyboard Layout and Language Selection
Select Normal Installation, disable Download Updates option and click Continue.
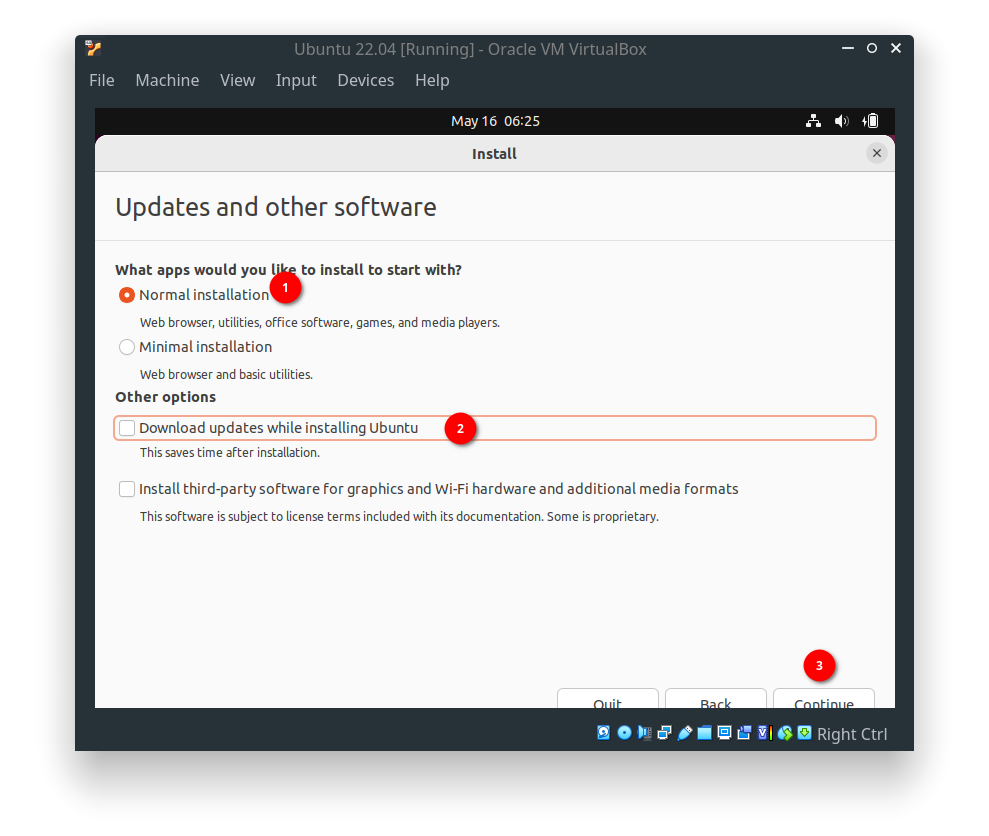 Ubuntu Install: Updates and Other Software
Select Erase disk and install Ubuntu option and click Install Now. 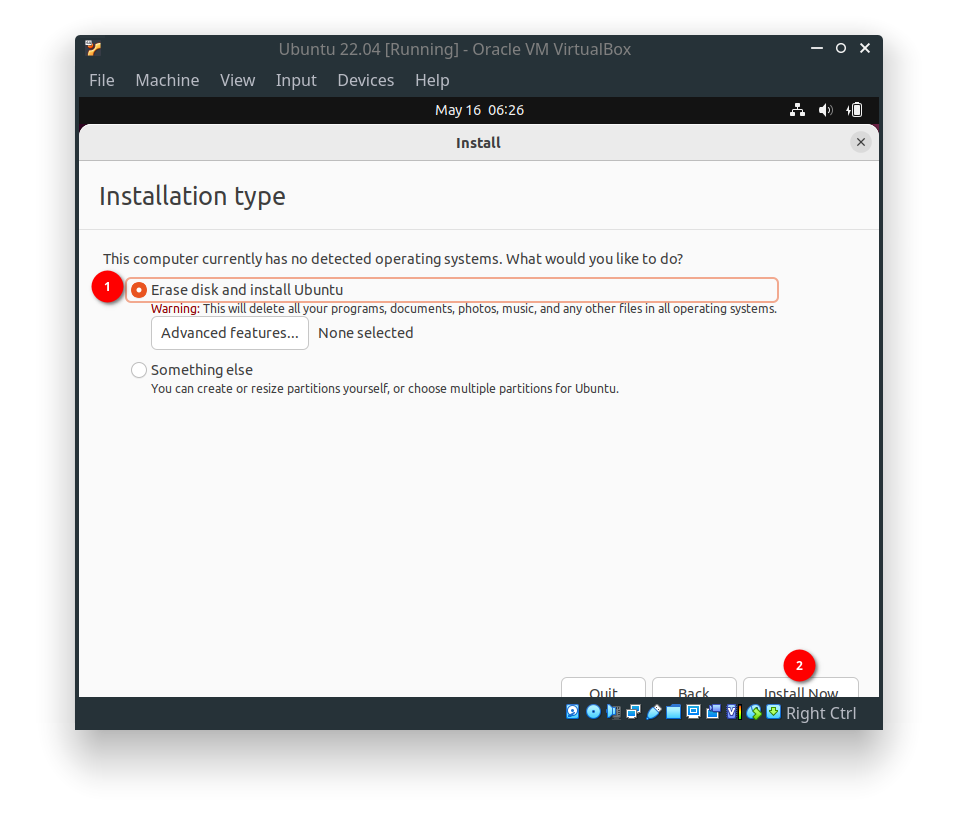 Ubuntu Install: Installation Type
Final confirmation will be asked at this stage. Click Continue.
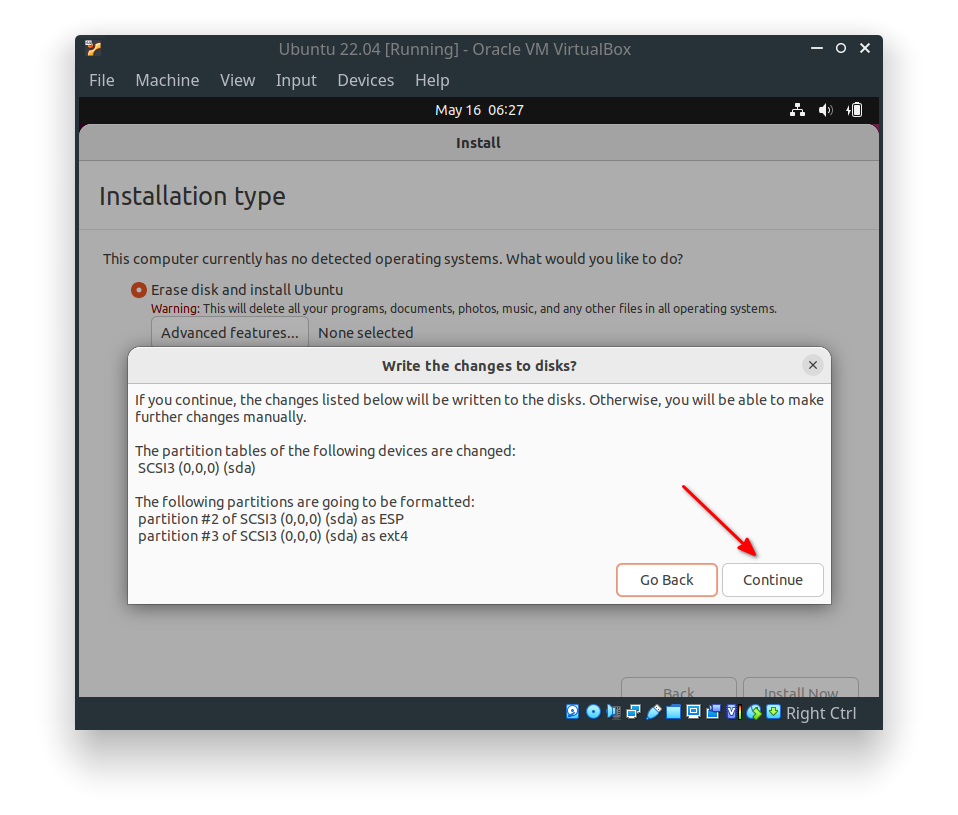 Ubuntu Install: Disk Erase Warning Message
Select your country by clicking on your country on the map.
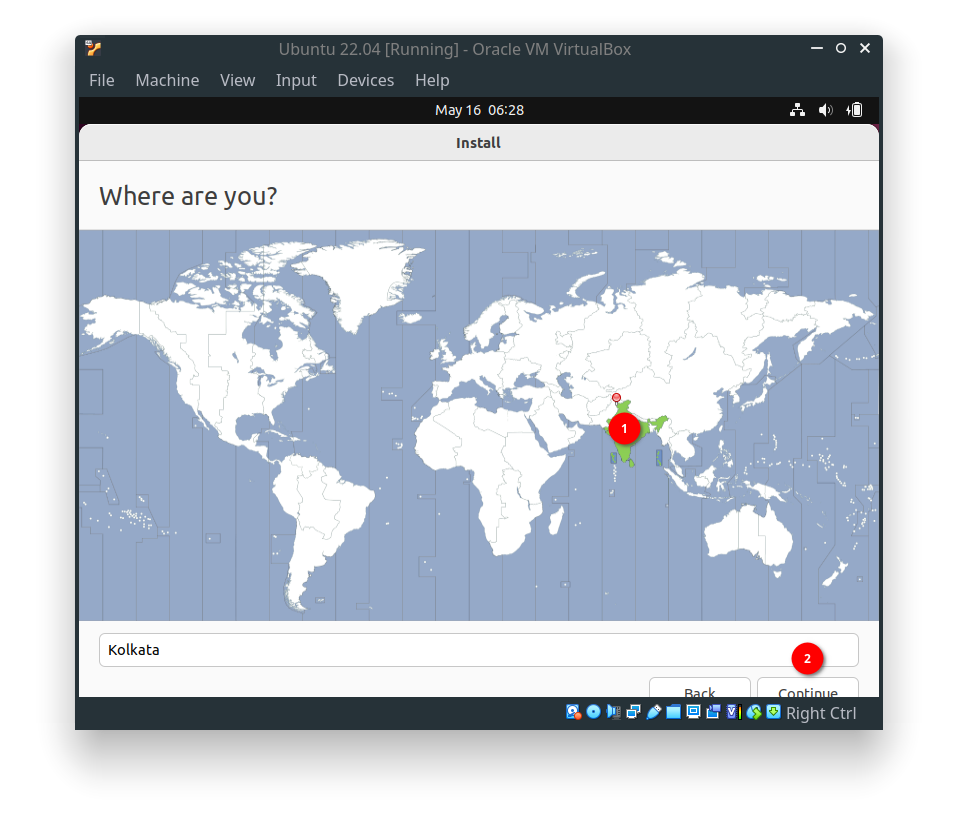 Ubuntu Install: Choose Country
Add your username and password here. You can also enable the auto-login option.
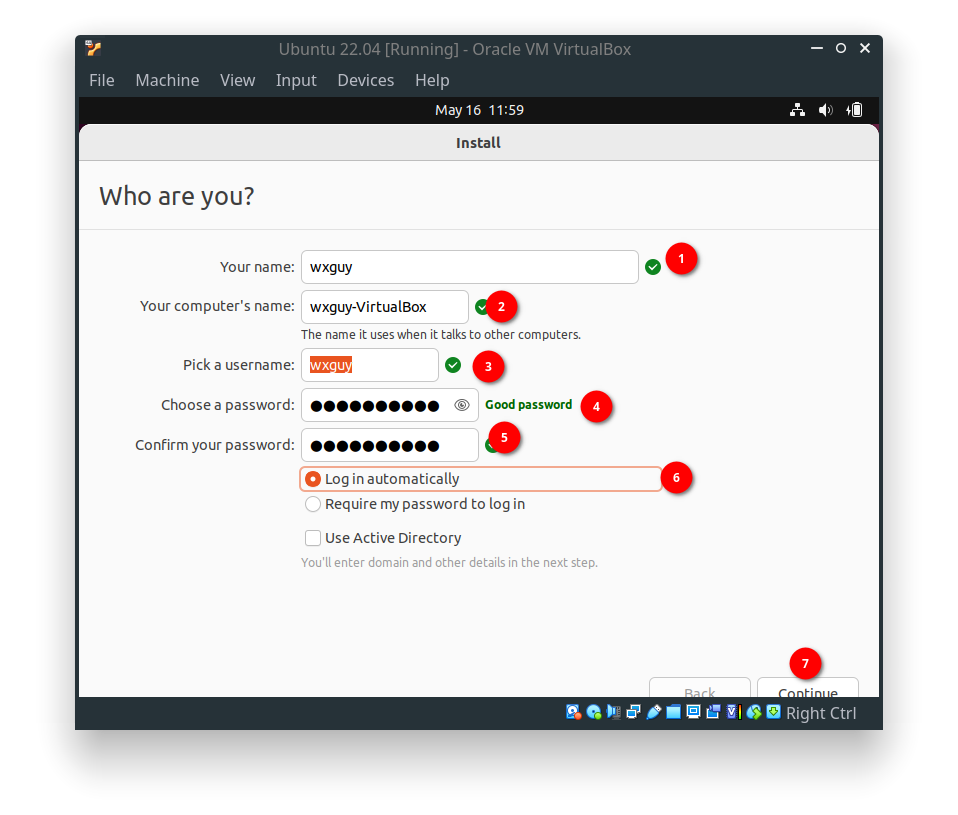 Ubuntu Install: New User Options
Sit and watch till your files are copied to the Guest OS location.
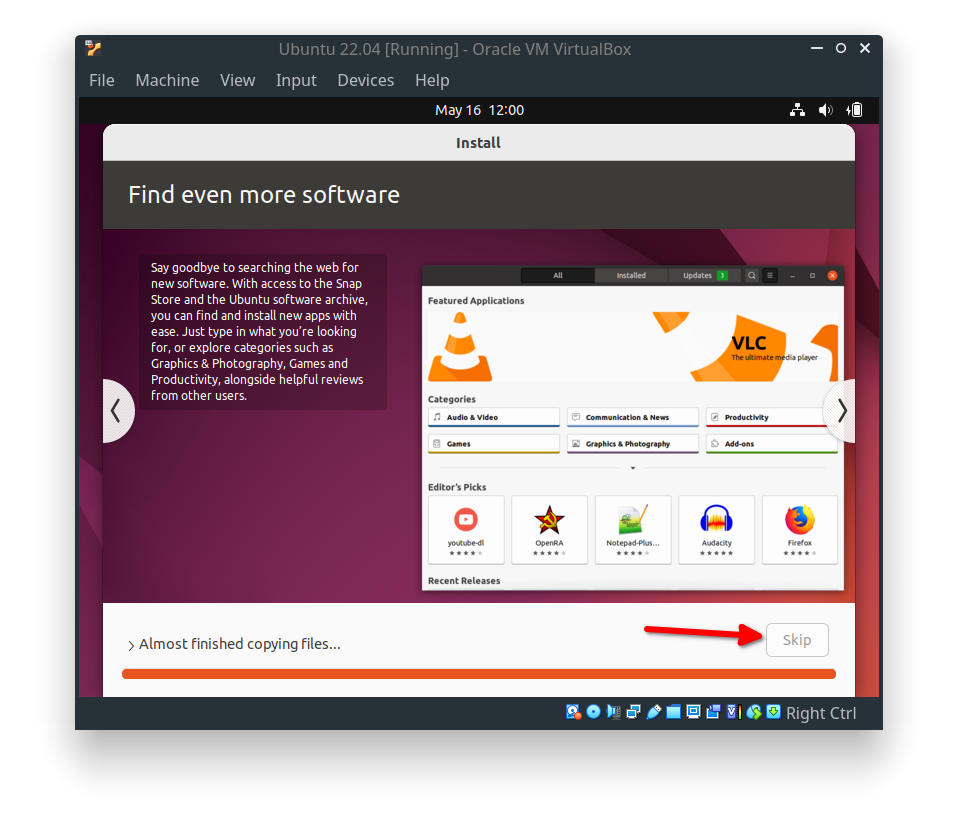 Ubuntu Install: Install Progress
Despite not accepting to download files during installation previously, the installer continues to download certain packages. Mostly, they are language-specific. Hence, you can safely select the Skip option.
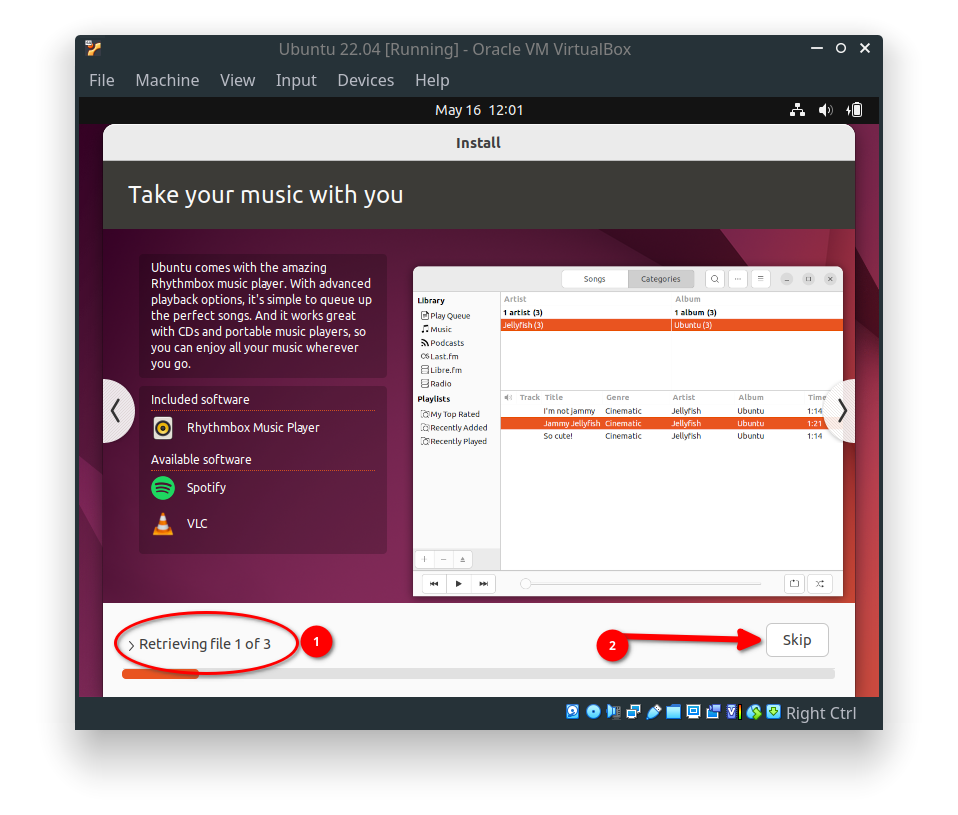 Ubuntu Install: Skip Download Files
Once Ubuntu installation is complete, reboot your system
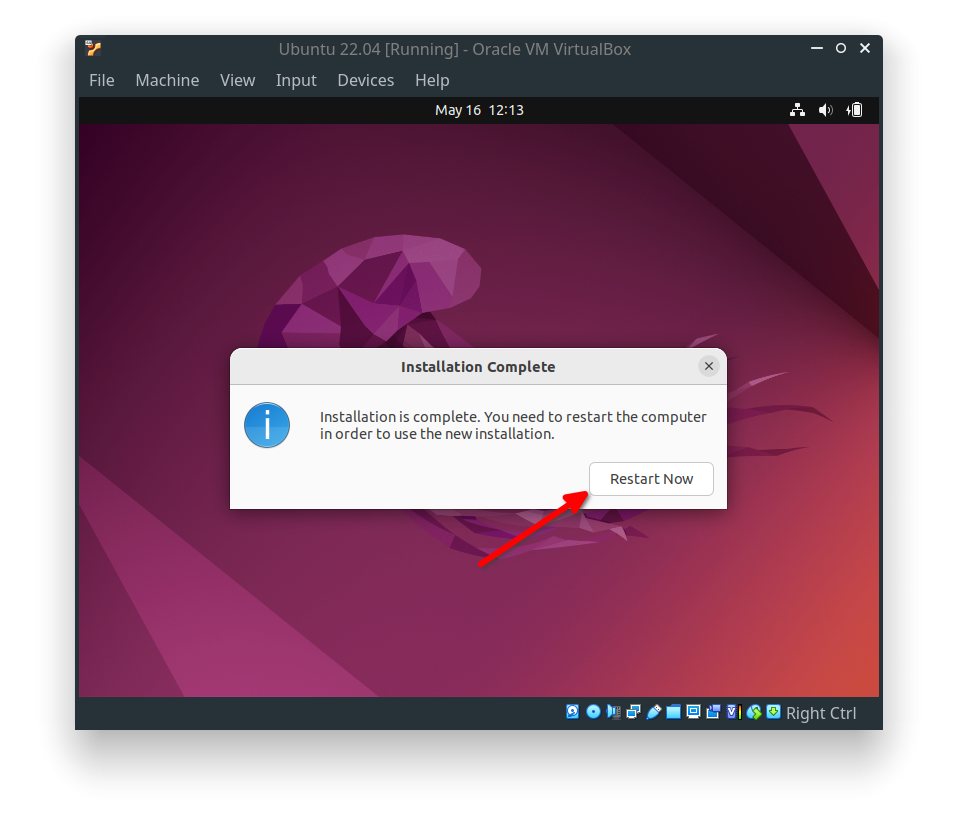 Ubuntu Install: First Reboot After Install
During the reboot, you must enter the Enter key to remove installation media.
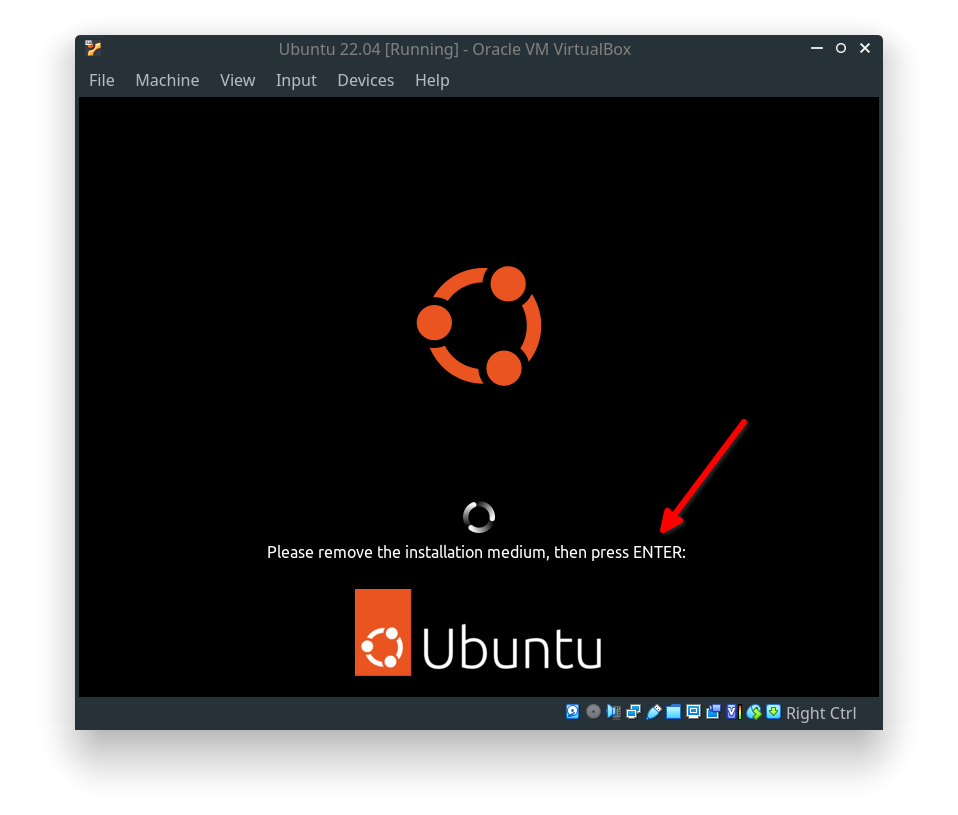 Ubuntu Install: Eject Removable Installation Media
After reboot, ubuntu will welcome the new user with a few options. You can Skip the online account option
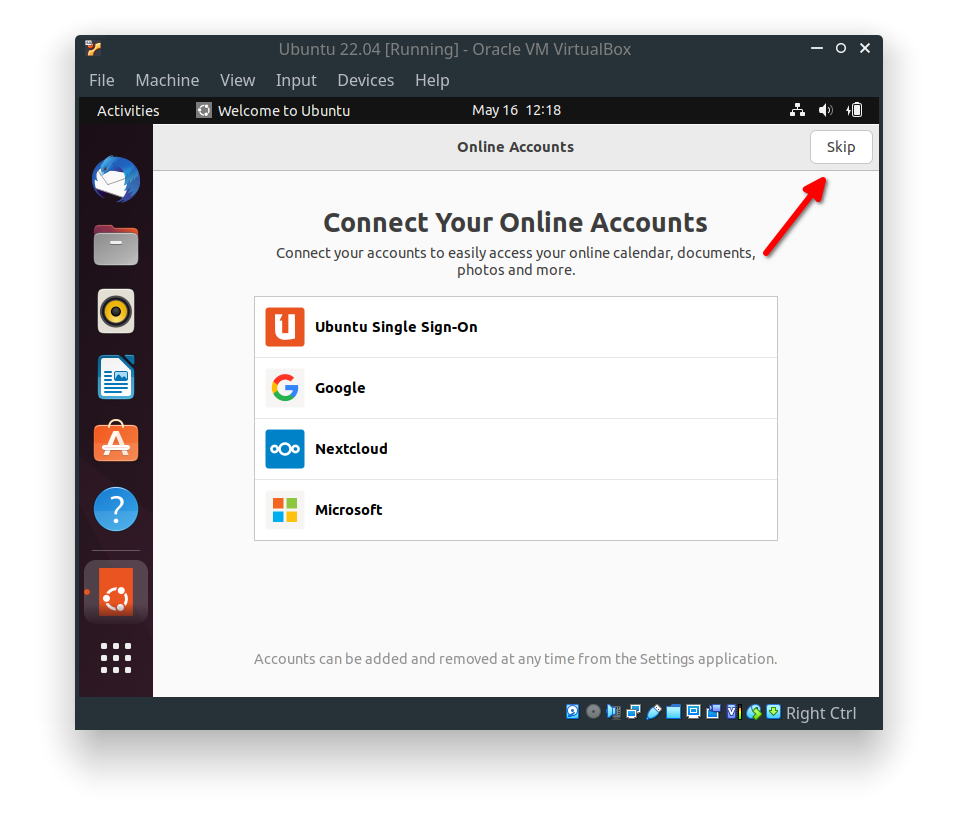 Ubuntu Install: Skip Online Account
If you wish to help Ubuntu you can select appropriate options and select the Next option.
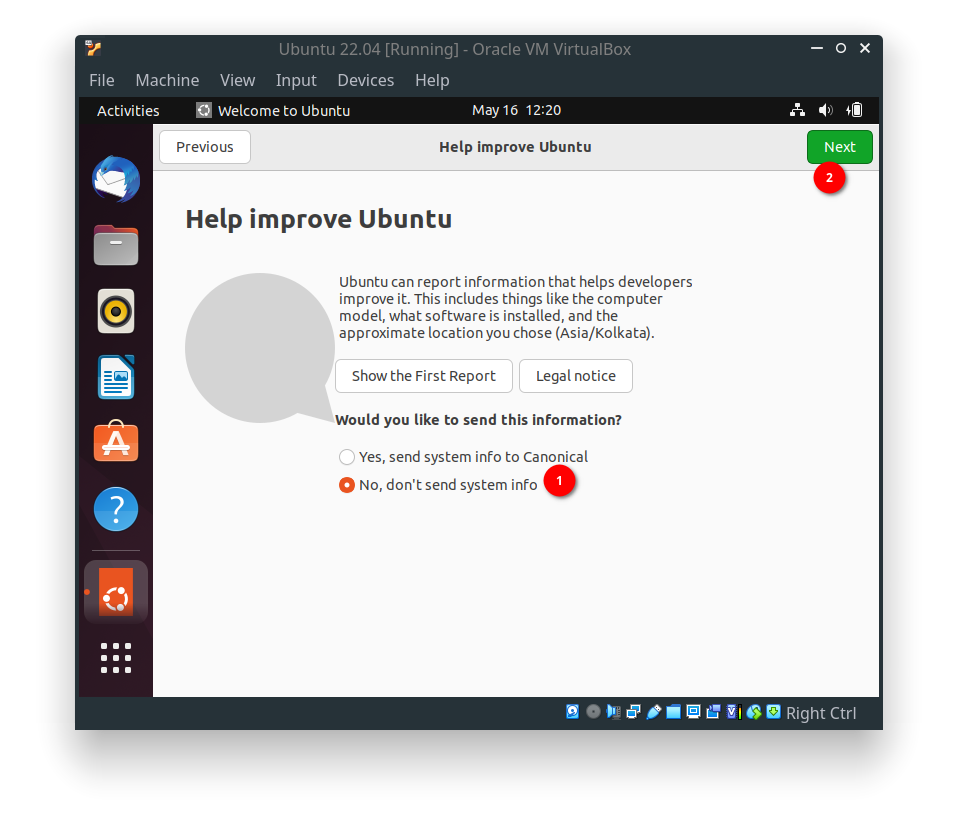 Ubuntu Install: Option to Help Ubuntu
You can enable or disable Location Services and click Next.
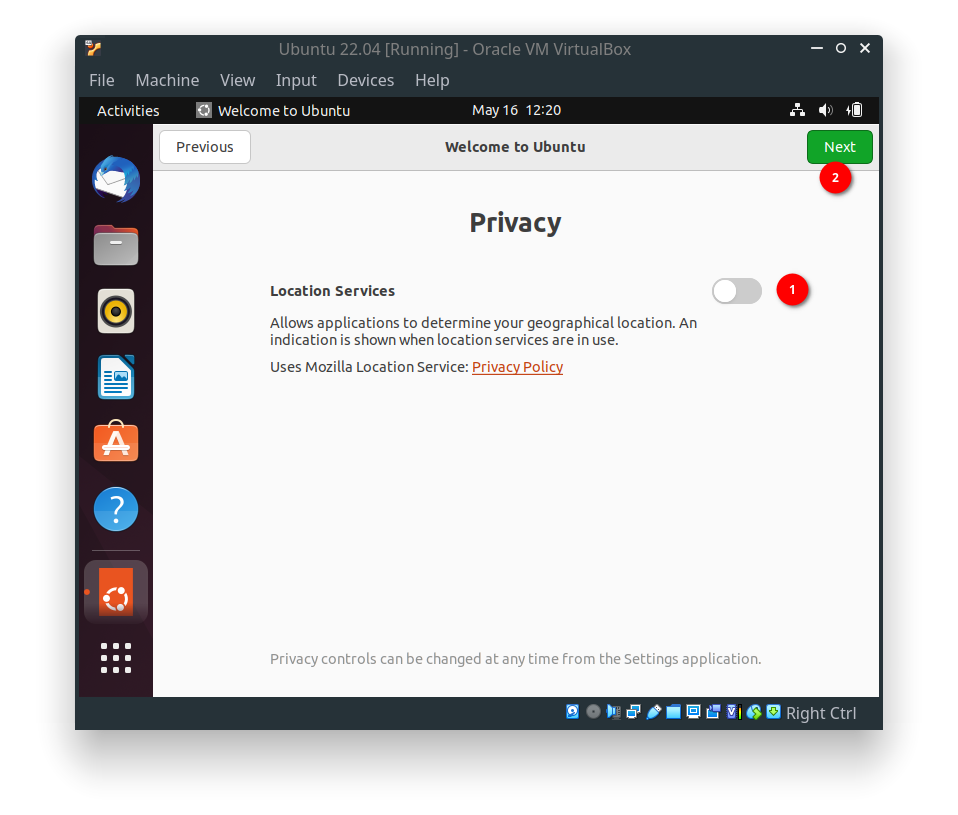 Ubuntu Install: Privacy Option
Click Done to complete the welcome screen.
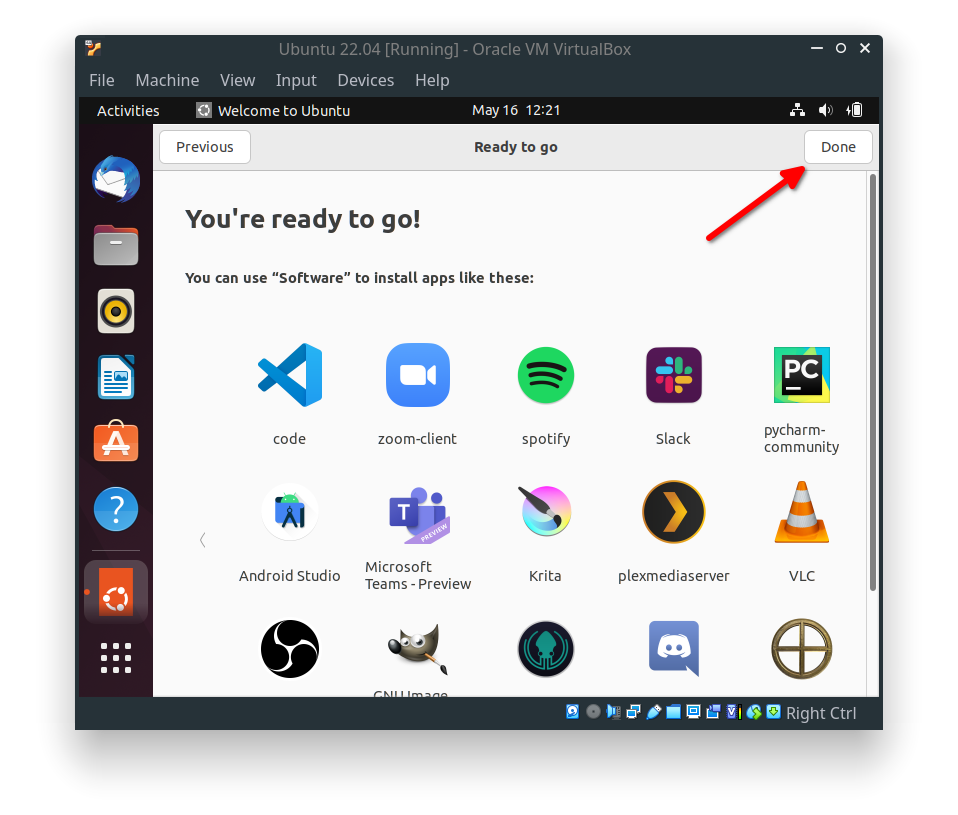 Ubuntu Install: Final Welcome Window
You must update and upgrade your system to the latest packages before proceeding further. You can use the following commands to update and upgrade your system.
1
2
$ sudo apt update -y
$ sudo apt upgrade -y
or follow the rest of the guide to set up the best server for your country and update your system.
On my system, I could not update to the latest packages as it always failed with the index failed to download error message. So I decided to change my server to the best one. For this open the Software & Updates window by searching on the activities search option.
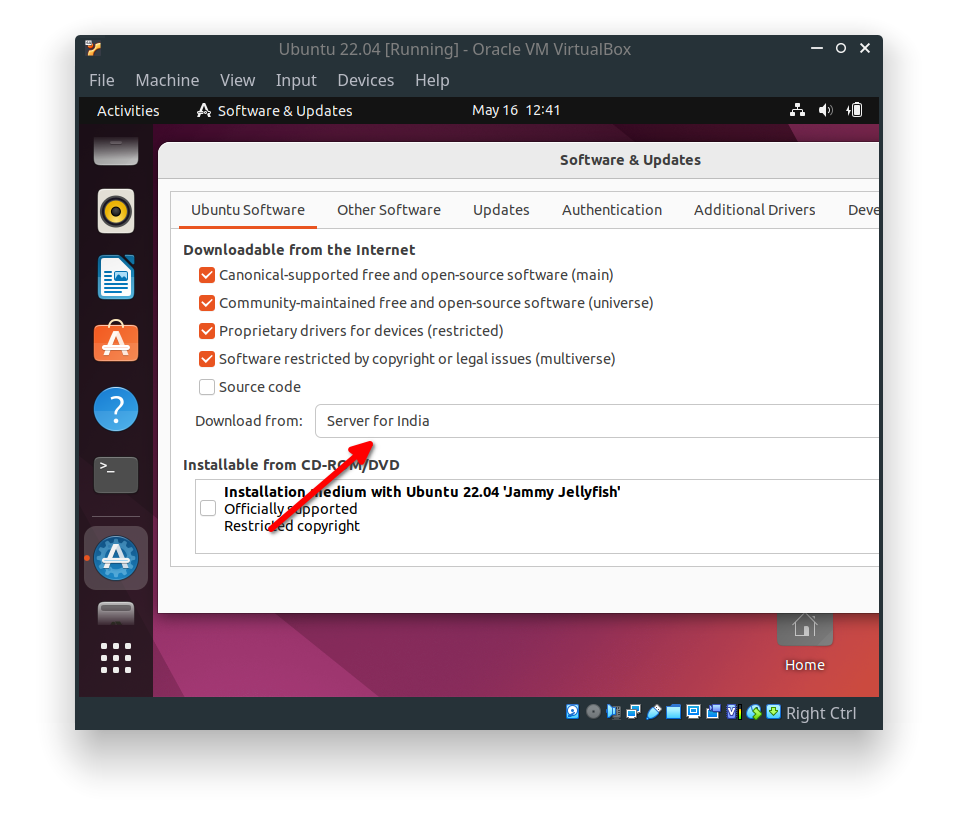 Ubuntu Install: Software And Updates Window
Now click on the Download From drop-down menu and select the Other option.
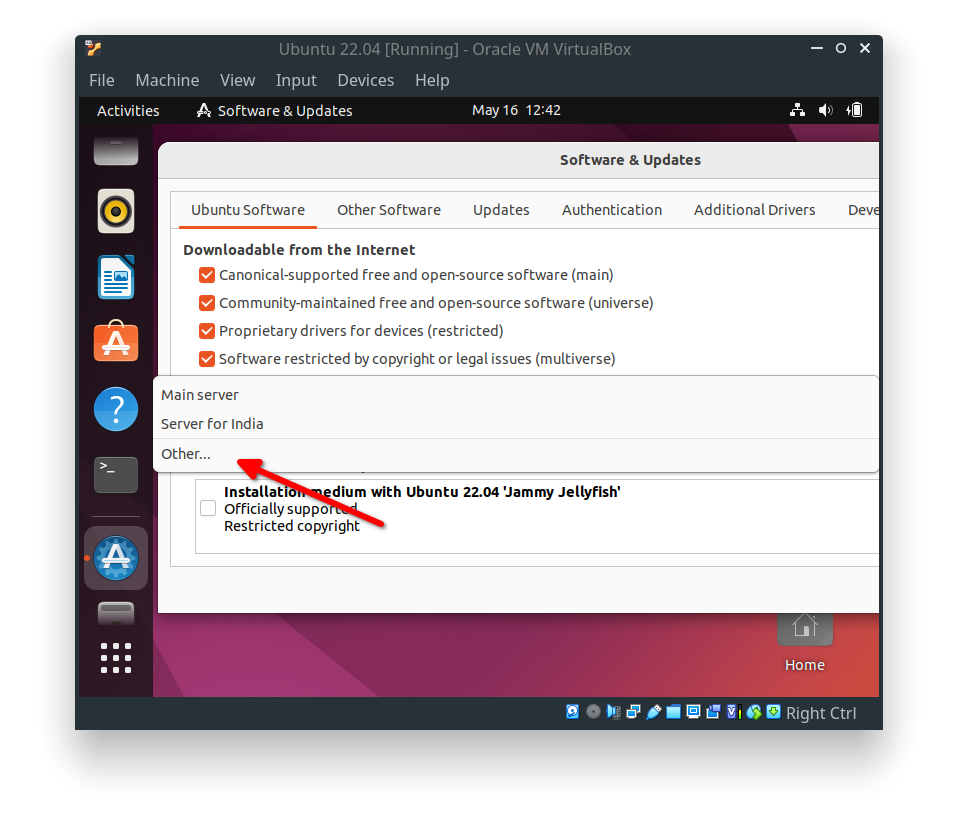 Ubuntu Install: Software And Updates Window Other Server
In the new window, click on the Select best server option.
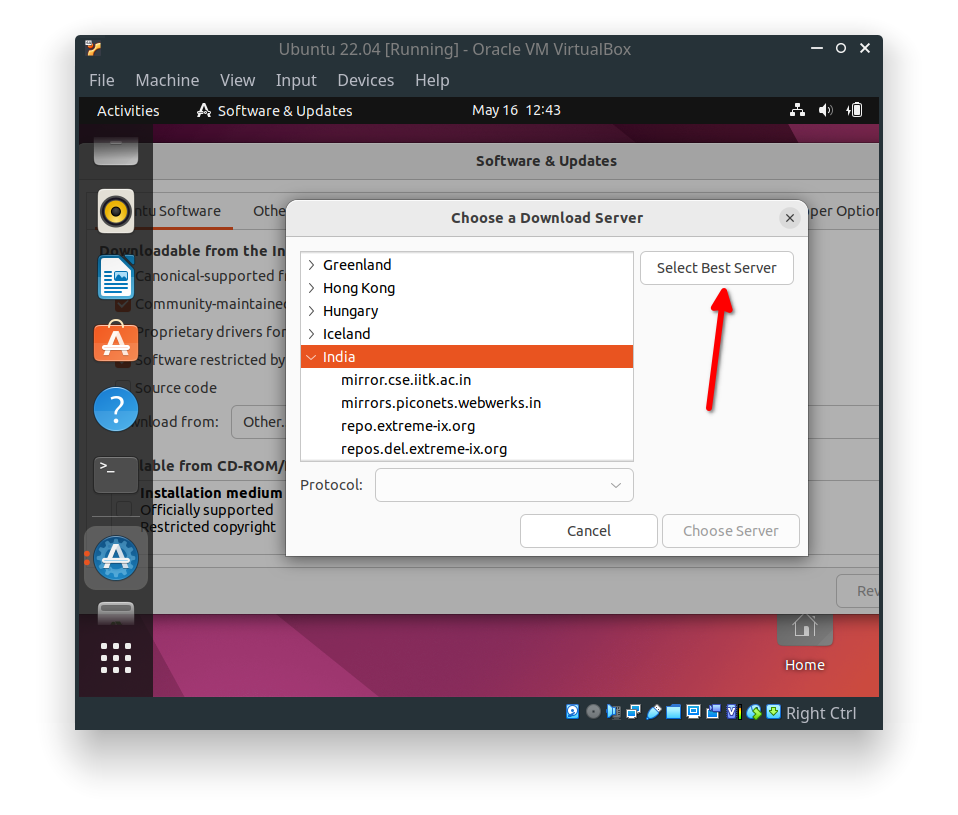 Ubuntu Install: Software And Updates Window Best Server
Wait for a few minutes as it will check for the best server for you.
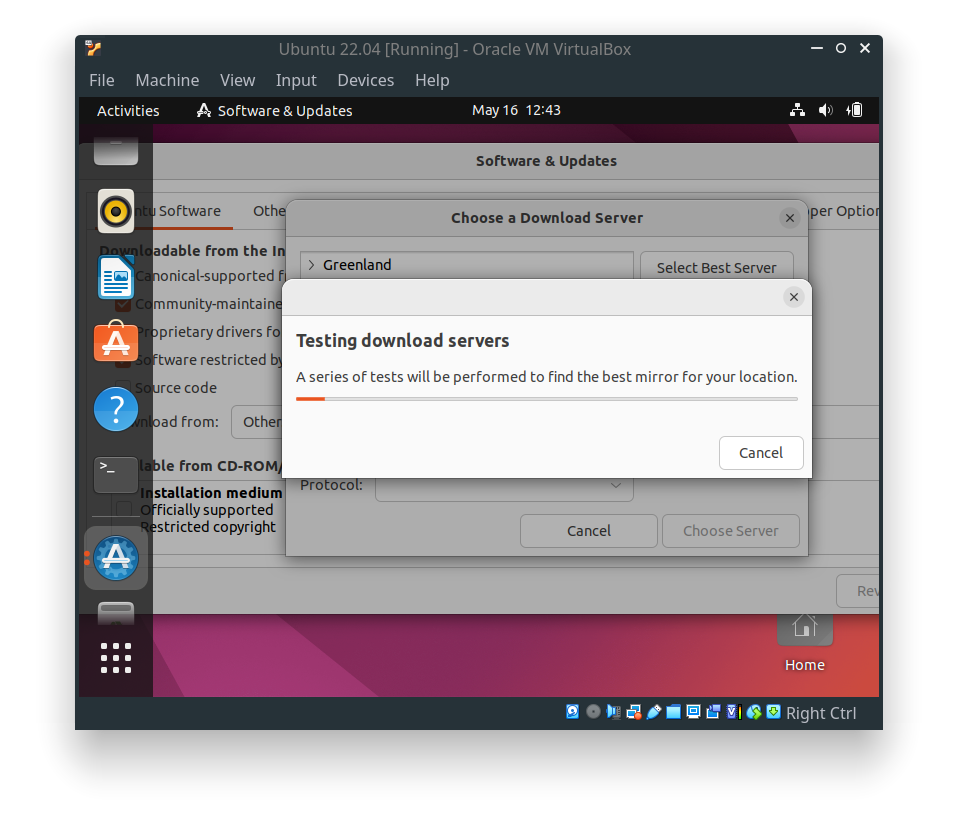 Ubuntu Install: Testing Best Server
Once the best server is automatically selected, you can select the Choose server option.
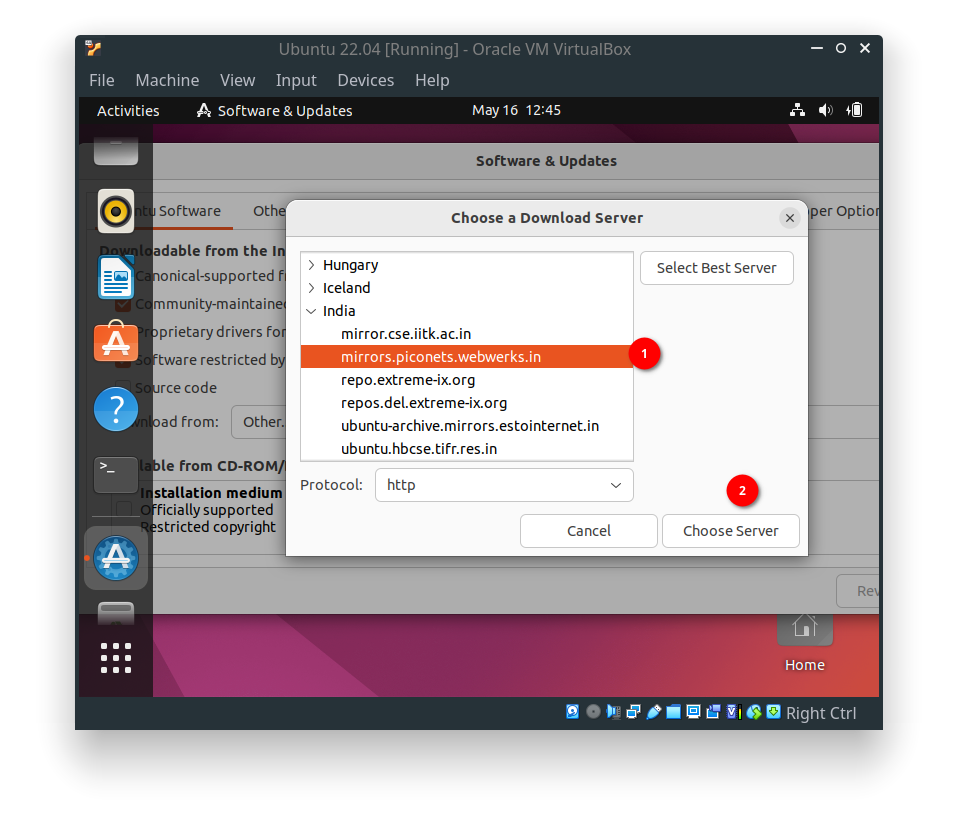 Ubuntu Install: Choose Best Server
Finally, Reload to download a new index from the newly selected repository.
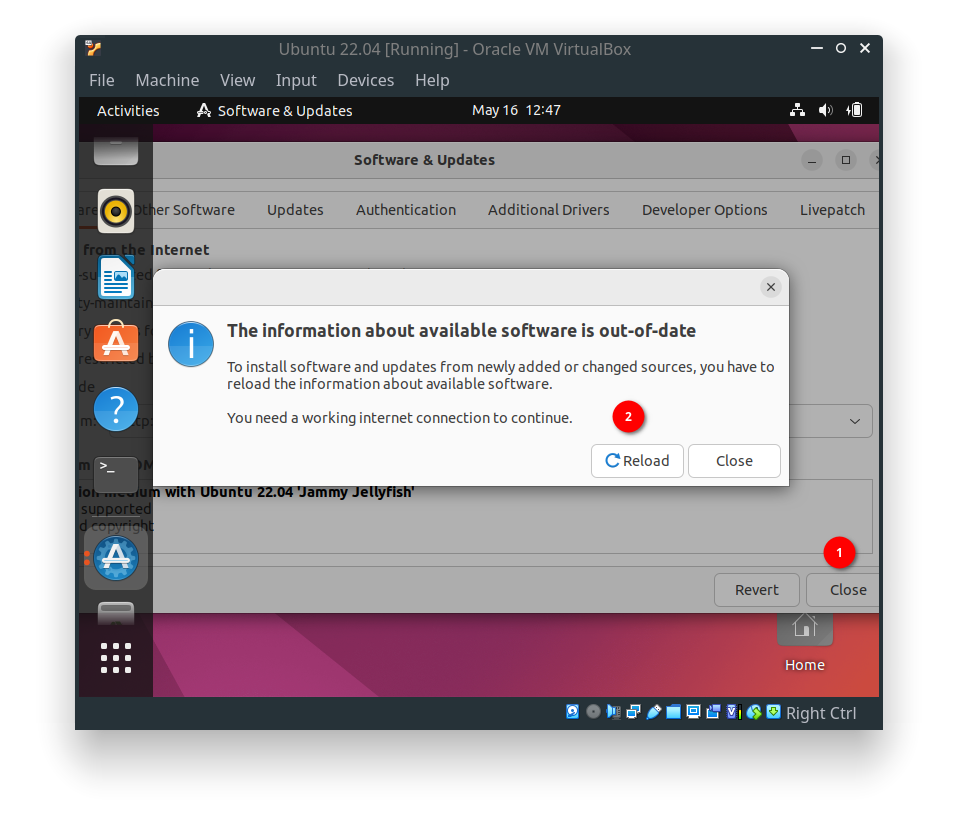 Ubuntu Install: Reload Packages from New Repo
Again search and open the Software Updater application.
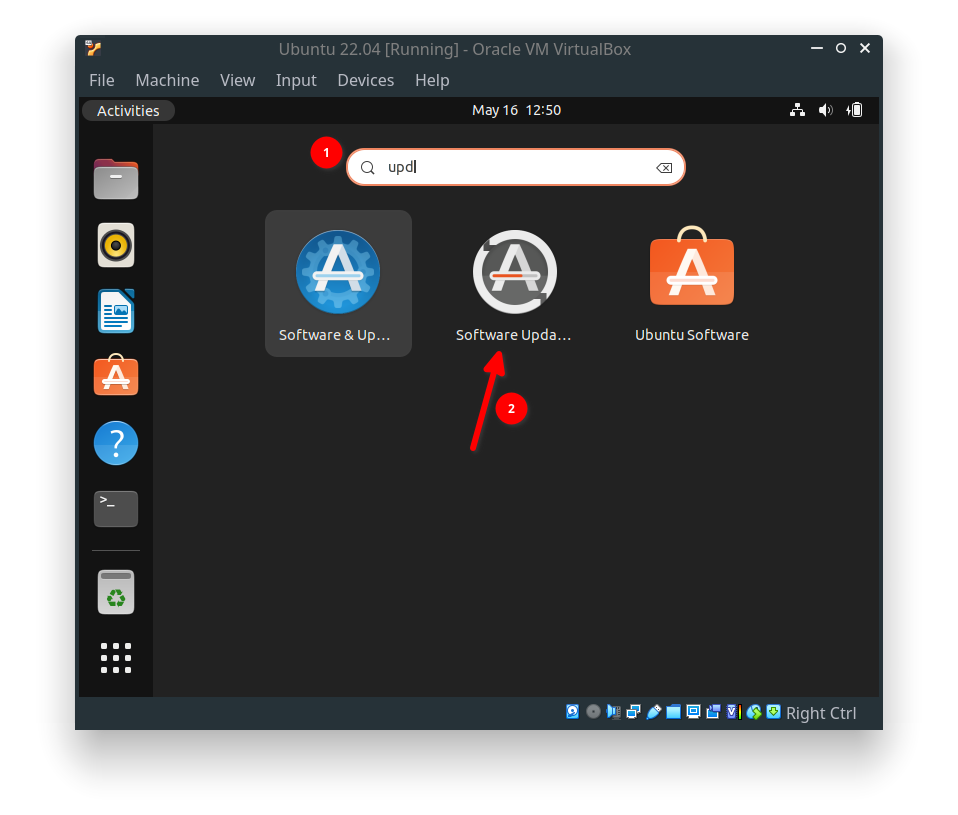 Ubuntu Install: Search Software Updater
and select the Install Now option.
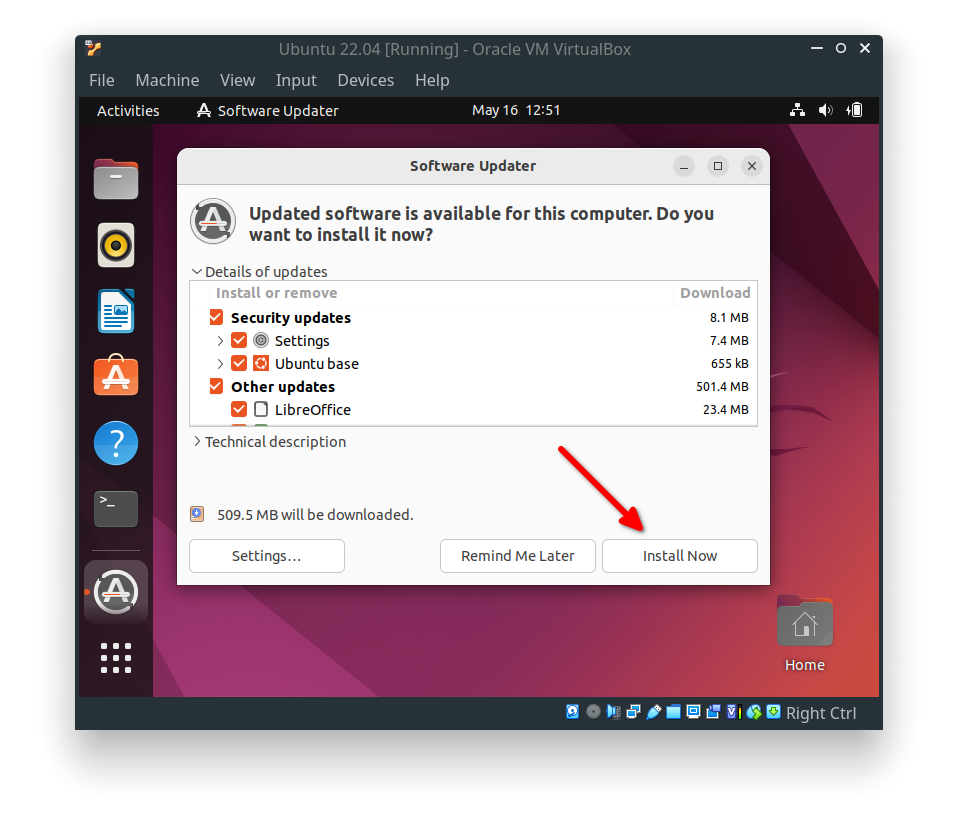 Ubuntu Install: Install New Updates
After updating your system, reboot the system again.
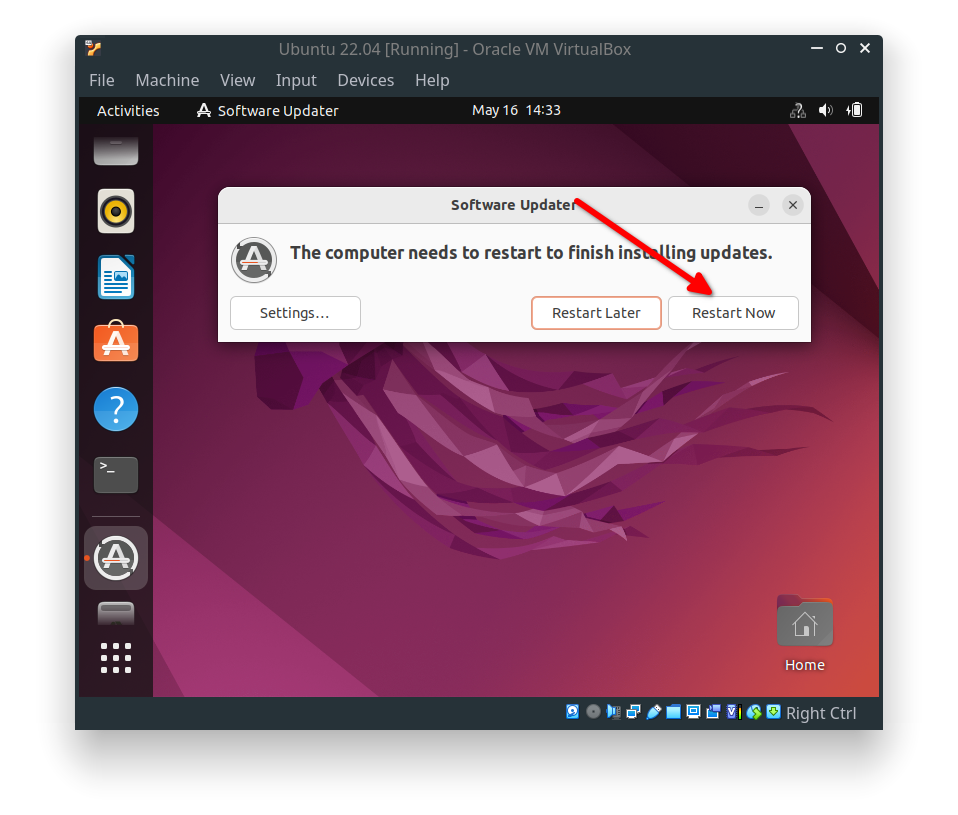 Ubuntu Install: Reboot System After Update
Ubuntu 22.04 Post Install Configurations
Though you have successfully installed the system, it is still not in usable condition. To make it user-friendly, you need to install VirtualBox Guest Addition Package. You can successfully install only if you have kernel header files installed on Guest OS. So we will install it now using the following command.
1
$ sudo apt install -y build-essential linux-headers-$(uname -r)
Now go to the Devices menu in the Virtual Machine window and select the Insert Guest Addition CD Image option. This will automatically mount the Guest Addition ISO image into Ubuntu Guest OS.
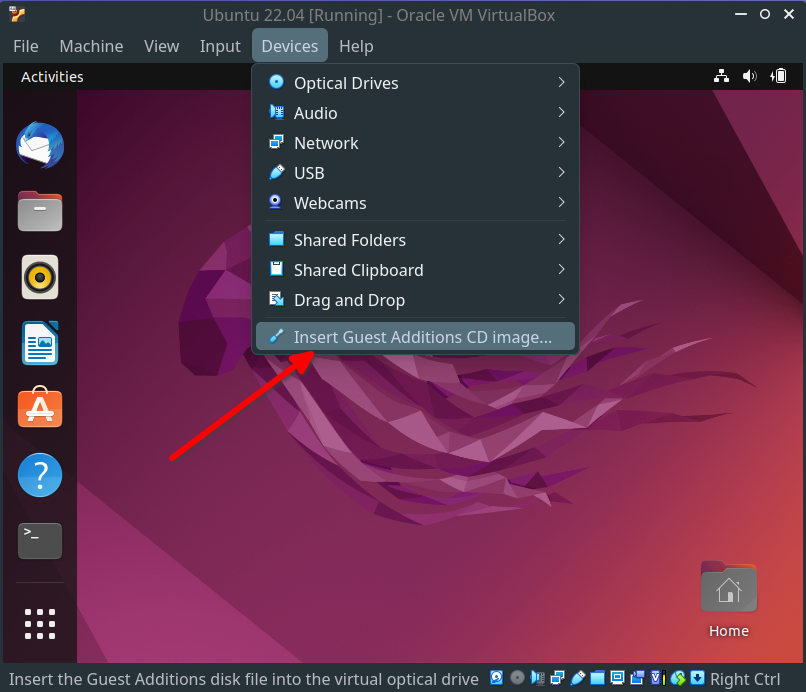 Ubuntu Post Install: Insert Guest Addition ISO
Now navigate to the location where the Guest Addition ISO image is mounted and open the location in the terminal.
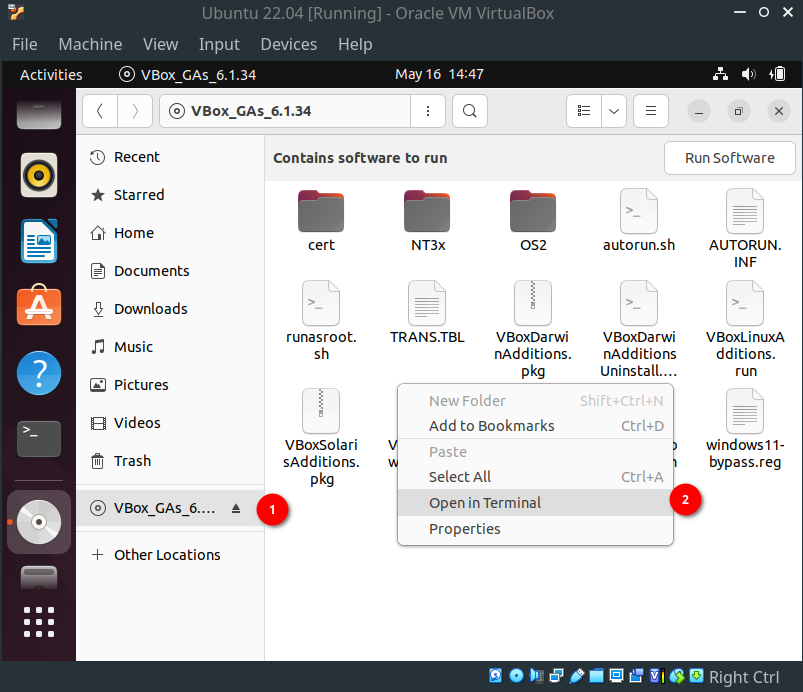 Ubuntu Post Install: Open Terminal From Mounted ISO
Now you can install VirtualBox Guest Addition for Linux by executing the following command.
1
$ sudo ./VBoxLinuxAdditions.run
You must reboot the system again to take this effect.
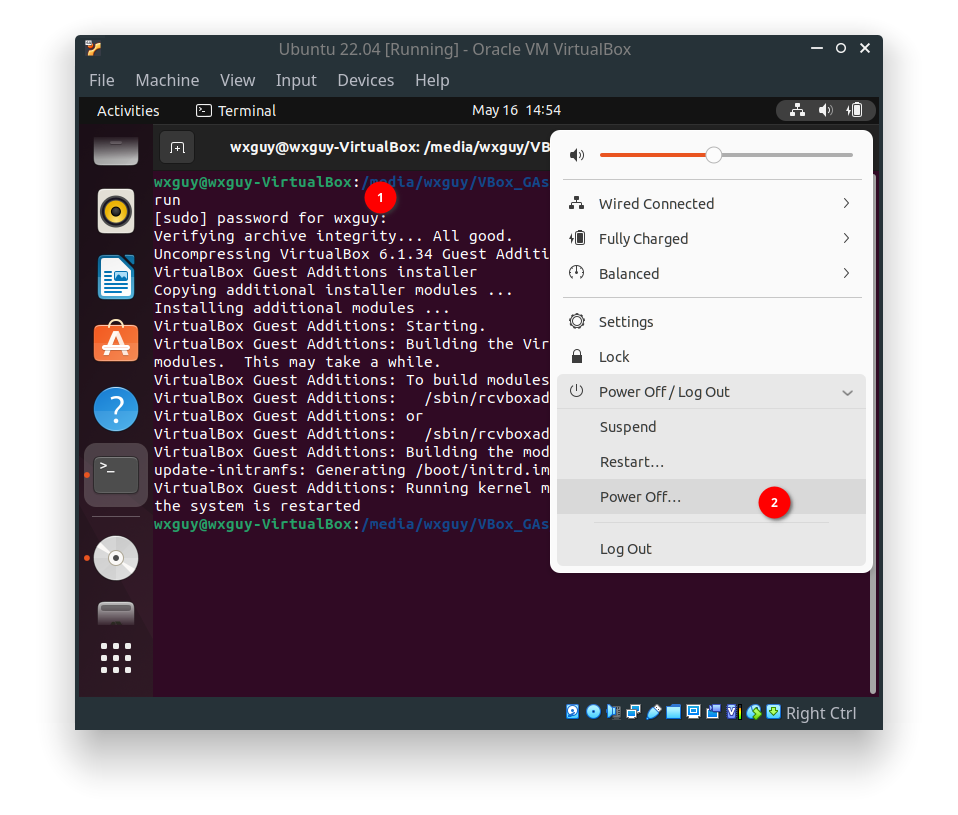 Ubuntu Post Install: Reboot After Installing VB GA
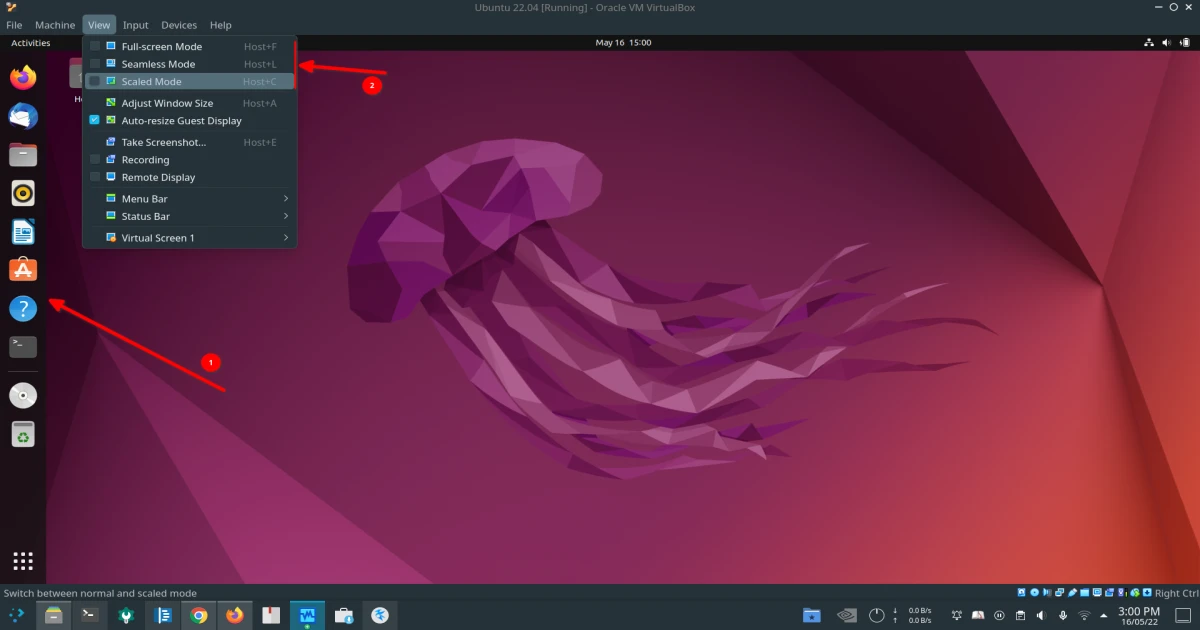
Finally, you can see that VirtualBox automatically adjusted the Guest OS aspect ratio to the size of the Virtual Machine window. You can also play around with other view modes but remember to shortcut key combos.
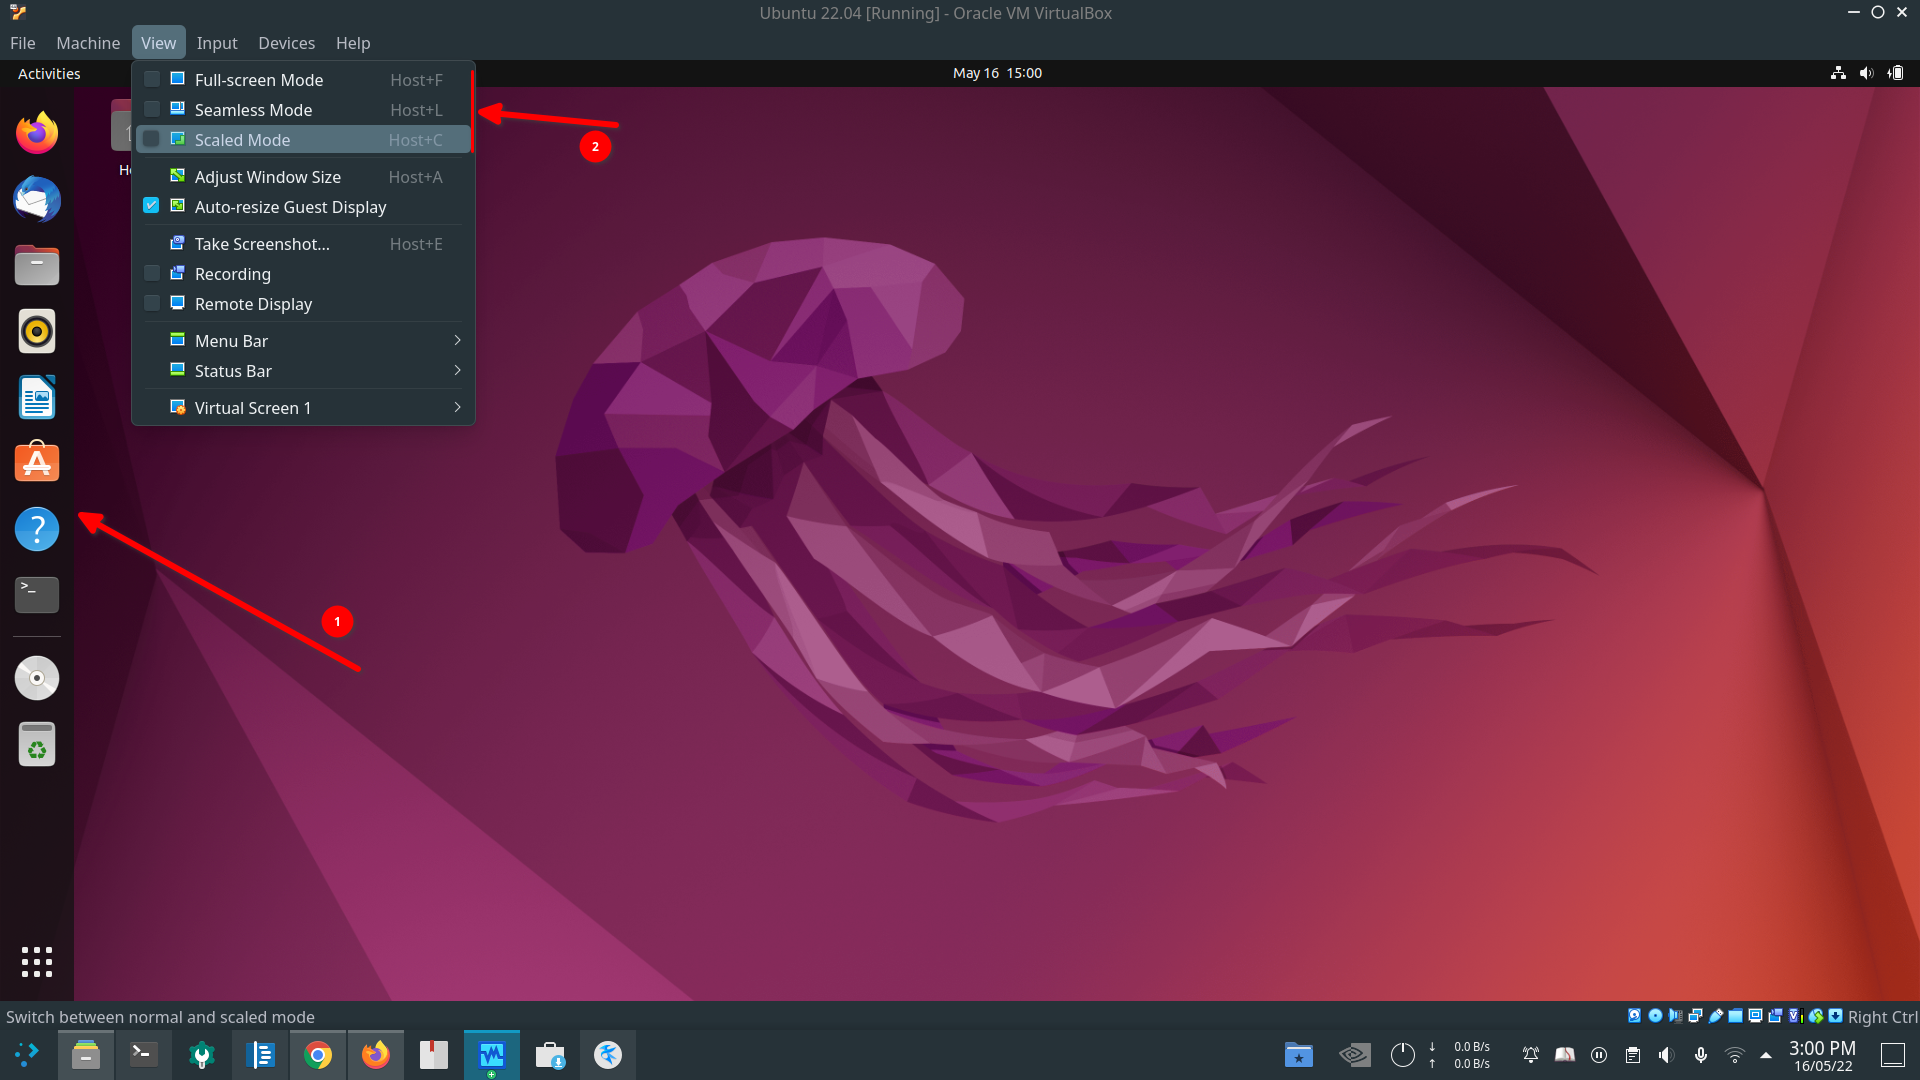 Ubuntu Post Install: Look After Installing VB GA
Sharing of Files Using Shared Folder
Though we have added Shared Folder from Host OS and showing up in Guest OS’s file manager, you will not be able to use it. When you access it for the first time you will get the following Permission Error.
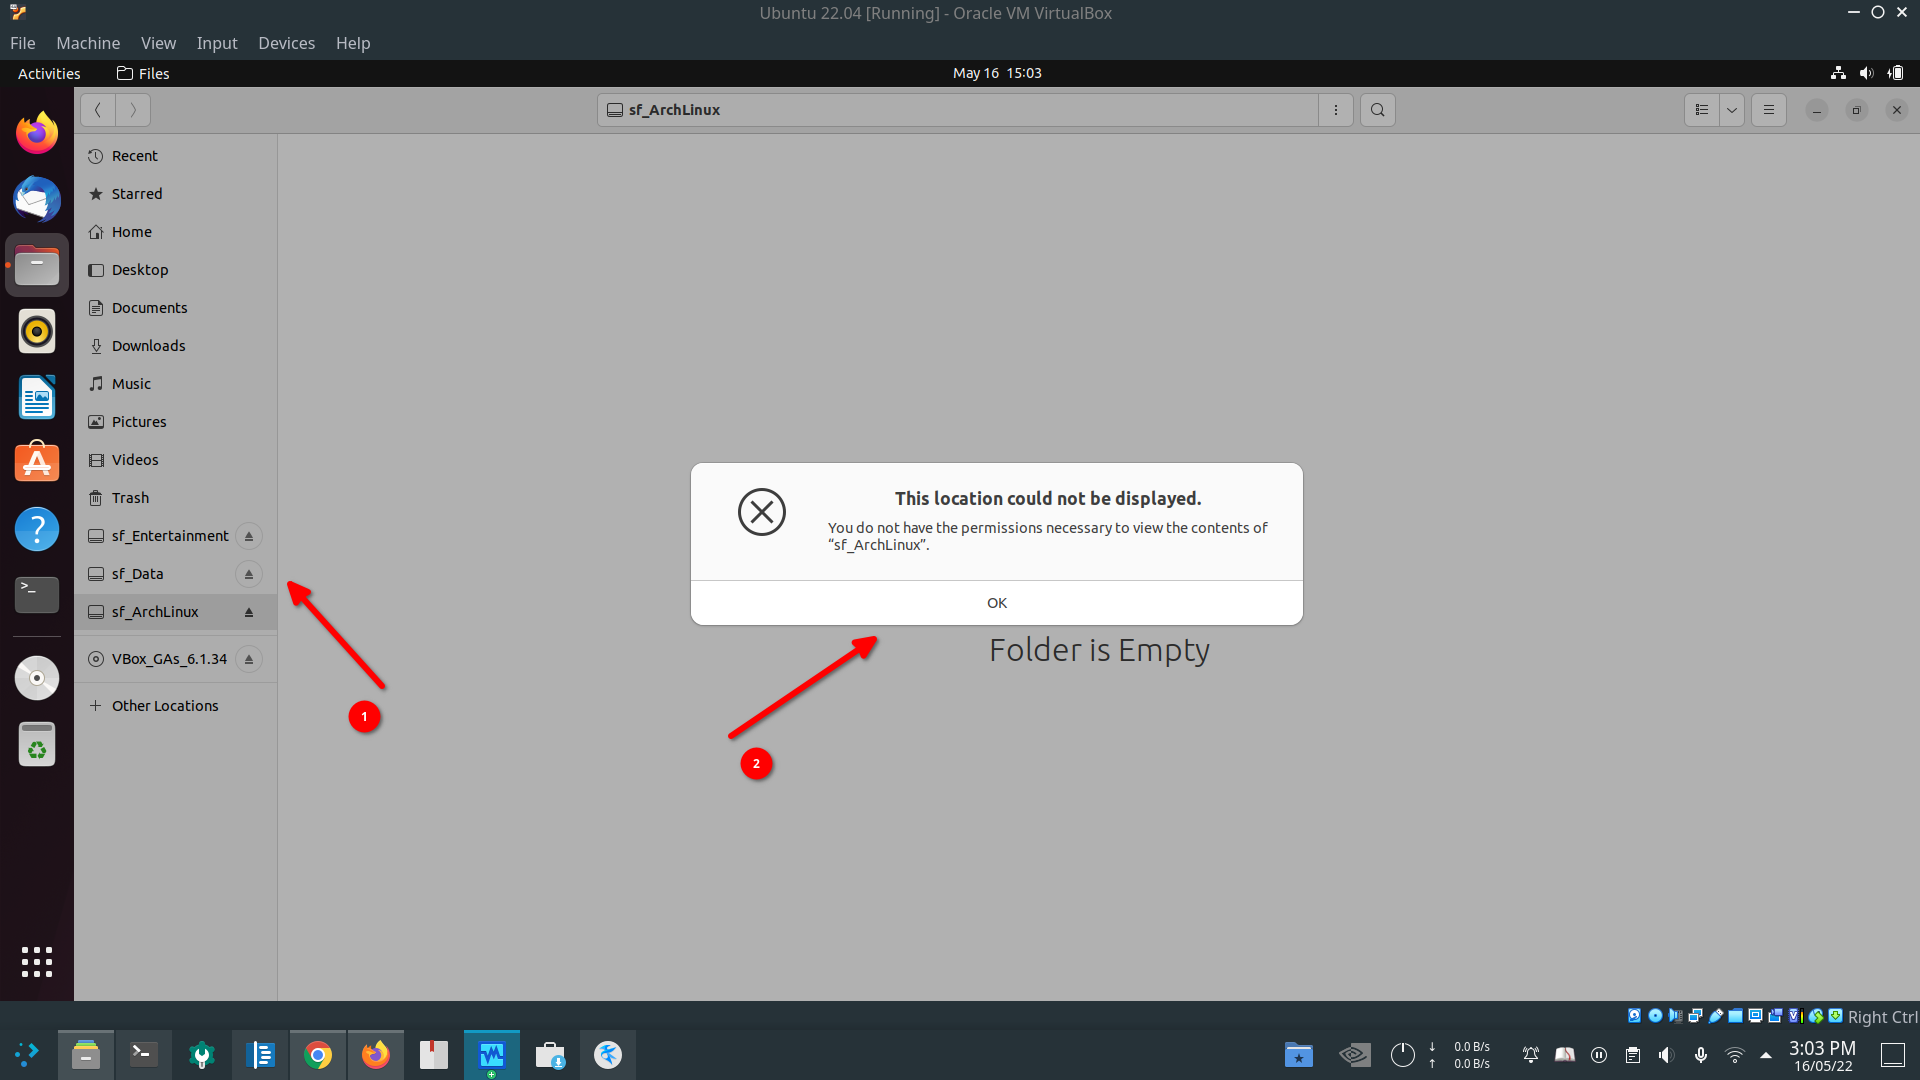 File Share: Permission Error For Shared Folder
To avoid permission errors, we need to add vboxsf to the group. the following command will do that.
1
$ sudo usermod -aG vboxsf $(whoami)
Now onwards, you can start using Ubuntu 22.04 comfortably as we have done a lot of tweaking.
Closing Thoughts
Though the steps involved in configuring VirtualBox are many, they are straightforward. One of the best parts of VirtualBox is its documentation and Sharing of the Folder option. With this, you will feel as if you are running an Operating System on real hardware. I would highly recommend VirtualBox for your Virtual Machine needs.
You can download this article from here for free.
